Avalanche was born within ContinualAI with a clear goal in mind:
Pushing Continual Learning to the next level, providing a shared and collaborative library for fast prototyping, training and reproducible evaluation of continual learning algorithms.
As a powerful avalanche, a Continual Learning agent incrementallyimproves its knowledge and skills over time, building upon the previously acquired ones and learning how to interact with the external world.
We hope Avalanche may trigger the same positive reinforcement loop within our community, moving towards a more collaborativeand inclusive way of doing research and helping us tackle bigger problems, faster and better, but together! 👪
💪The Avalanche Advantage
Avalanche has several advantages:
Shared & Coherent Codebase: Aren't you tired of re-inventing the wheel in continual learning? We are. Re-producing paper results has always been daunting in machine learning and it is even more so in continual learning. Avalanche makes you stop re-write your (and other people) code all over again with a coherent and shared codebase that provides already all the utilities, benchmark, metrics and baselines you may need for your next great continual learning research project!
Errors Reduction: The more code we write, the more bugs we introduce in our code. This is the rule, not the exception. Avalanche, let you focus on what really matters: defining your CL solution. Benchmarks preparation to training,evaluation and comparison with other methods will be already there for you. This in turn, massively reduce the amount of errors introduced and the time needed to debug your code.
But most of all, Avalanche, can help us standardize our field and work better together, more collaboratively, towards our shared goal of making machines learn over time like humans do.
Avalanche the first experiment of a End-to-end Library for reproducible continual learning research where you can find benchmarks, algorithms, evaluation utilities and much more in the same place.
Avalanche is a framework in constant development. Thanks to the support of the community and its active members we plan to extend its features and improve its usability based on the demands of our research community!
A the moment, Avalanche is in Beta (v0.2.1). We support a large number of Benchmarks, Strategies and Metrics, that makes it, we believe, the best tool out there for your continual learning research! 💪
You can find the full list of available features on the .
Do you think we are missing some important features? Please let us know! We deeply value your feedback!
Avalanche supports all the most popular computer vision datasets used in Continual Learning. Some of them are available in Torchvision, while other have been integrated by us. Most datasets are automatically downloaded by Avalanche.
Toy datasets: MNIST, Fashion MNIST, KMNIST, EMNIST, QMNIST.
Avalanche uses and extends pytorch nn.Module to define continual learning models:
support for nn.Modules and torchvision models.
Dynamic output heads for class-incremental scenarios and multi heads for task-incremental scenarios.
support for architectural strategies and dynamically expanding models such as progressive neural networks.
📊 Metrics and Evaluation
Avalanche provides continuous evaluation of CL strategies with a large set of Metrics. They are collected and logged automatically by the strategy during the training and evaluation loops.
accuracy, loss, confusion (averaged over streams or experiences).
Faster Prototyping: As researchers or data scientists, we have dozens ideas every day and time is always too little to execute them. However, if we think about it, most of the time spent in bringing our ideas to life is consumed in installing software, preparing and cleaning our data, preparing the experiments code infrastructure and so on. Avalanche lets you focus just on the original algorithmic proposal, taking care of most of the rest!
Improved Reproducibility & Portability: One of the great features of Avalanche, is the possibility of reproducing experimental results easily and on any OS. Researchers can simply plug-in their algorithm into the codebase and see how it goes with respect of other researchers' methods. Their algorithm in turn, is used as a baseline for other methods, creating a virtuous circle. This is only possible thanks to the simple, yet powerful idea of providing shared benchmarks, training and evaluation in a single place.
Improved Modularity: Avalanche has been designed with modularity in mind. As you will learn more about Avalanche, you will realize we have sometimes forego simplicity in favor of modularity and reusability (we hate code replication as you do 🤪). However, we believe this will help us scale in the near future as we collaboratively bring this codebase into maturity.
Increased Efficiency & Scalability: Full-stack researchers & data scientists know this, making your algorithm memory and computationally efficient is tough. Avalanche is already optimized for you, so that you can run your ImageNet continual learning experiment on your 8GB laptop (buy a cooling fan 💨) or even try it on embedded devices of your latest product!
Loggers
Examples for the Loggers module offered in Avalanche
Avalanche offers concrete support for using standard logger like csv file, TensorBoard, etc. or even defining your own loggers. You can find examples related to the benchmarks here:
Tensorboard logger: this is a simple example that shows how to use the Tensorboard Logger.
WandB logger: This is a simple example that shows how to use the WandB Logger.
FAQ
Frequently Asked Questions
In this page we answer frequently asked questions about the library. We know these to be mostly pain points we need to address as soon as possible in the form of better features o better documentation.
How can I create a stream of experiences based on my own data?
You can use the Benchmark Generators: such utils in Avalanche allows you to build a stream of experiences based on an AvalancheDataset (or PyTorchDataset), or directly from PyTorch tensors, paths or filelists.
Why some Avalanche strategies do not work on my dataset?
We cannot guarantee each strategy implemented in Avalanche will work in any possible setting. A continual learning algorithm implementation is accepted in Avalanche if it can reproduce at least a portion of the original paper results. In the project we make sure reproducibility is maintained for those with every main avalanche release.
Avalanche: an End-to-End Library for Continual Learning
Powered by ContinualAI
Avalanche is an End-to-End Continual Learning Library based on , born within with the unique goal of providing a shared and collaborative open-source (MIT licensed) codebase for fast prototyping, training and of continual learning algorithms.
Avalanche can help Continual Learning researchers and practitioners in several ways:
How to Install
Installing Avalanche has Never Been so Simple
Avalanche has been designed for extreme portability and usability. Indeed, it can be run on every OS and native python environment. 💻🍎🐧
📦 Install Avalanche with Pip
you can install Avalanche with pip:
This will install the core version of Avalanche, without extra packages (e.g., object detection support, reinforcement learning support). To install all the extra packages run:
Introduction
Understand the Avalanche Package Structure
Welcome to the "Introduction" tutorial of the "From Zero to Hero" series. We will start our journey by taking a quick look at the Avalanche main modules to understand its general architecture.
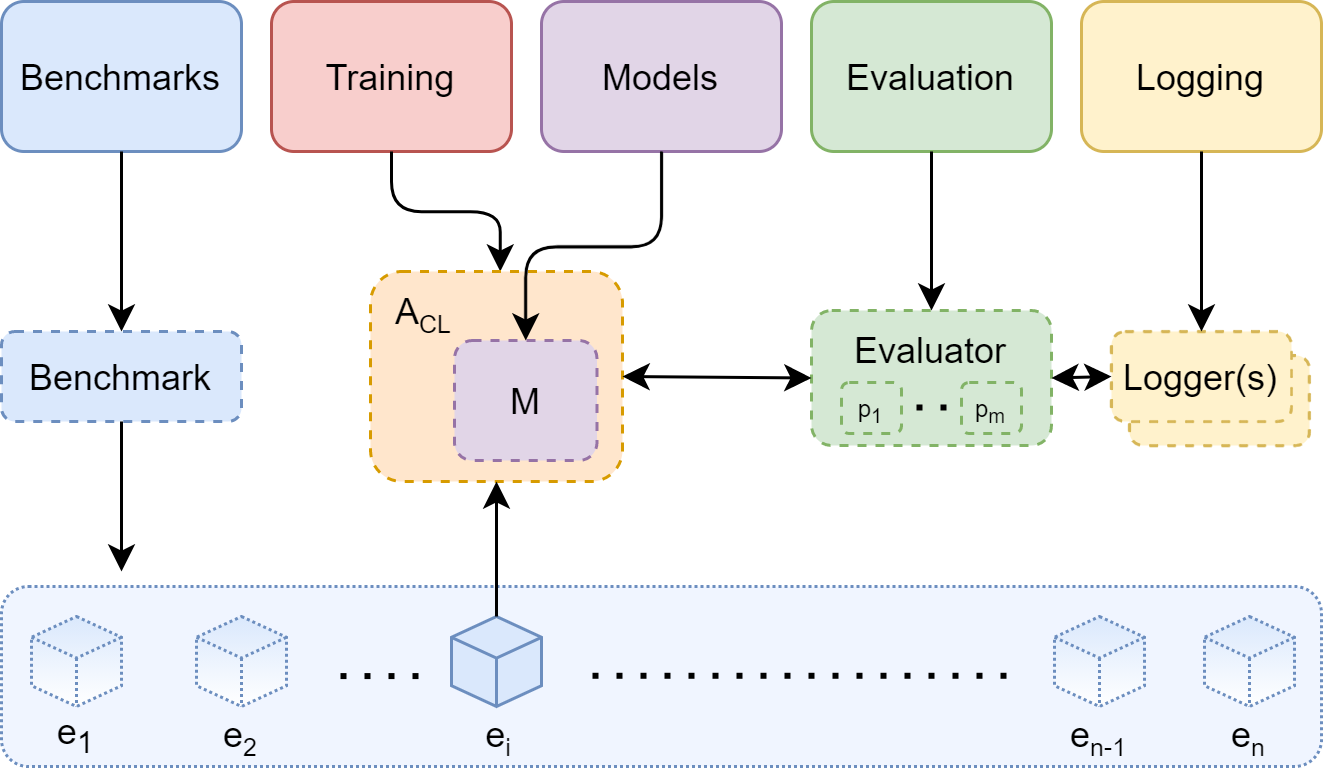
As hinted in the getting started introduction Avalanche is organized in five main modules:
Benchmarks: This module maintains a uniform API for data handling: mostly generating a stream of data from one or more datasets. It contains all the major CL benchmarks (similar to what has been done for ).
AvalancheDataset
Dealing with AvalancheDatasets
The AvalancheDataset is an implementation of the PyTorch Dataset class that comes with many useful out-of-the-box functionalities. For most users, the AvalancheDataset can be used as a plain PyTorch Dataset that will return x, y, t elements. However, the AvalancheDataset is much more powerful than a simple PyTorch Dataset.
A serie of Mini How-Tos will guide you through the functionalities of the AvalancheDataset and its subclasses:
Benchmarks
Benchmarks and DatasetCode Examples
Avalanche offers significant support for defining your own benchmarks (instantiation of one scenario with one or multiple datasets) or using "classic" benchmarks already consolidate in the literature.
You can find examples related to the benchmarks here:
: in this simple example we show all the different ways you can use MNIST with Avalanche.
Add Your Issue
Help us Find Bug in Avalanche
If you encounter a problem in Avalanche, please do not give up on us and help us fix it as soon as possible. This first of all means reporting it. We are grateful to all the people who took the time to report an issue or even fix it with a Pull Request.
Check current Avalanche issue or submit a new one here:
Please try to use the appropriate tags and explain your issue with a simple code snippet to reproduce it following the bug report template.
Models
Examples for the Models module offered in Avalanche
Avalanche offers basic support for defining your own models or adapt existing PyTorch models with a particular emphasis on model adaptation over time.
You can find examples related to the models here:
: This example shows how to train models provided by pytorchcv with the rehearsal strategy.
Guidelines
For a Swift and Effective Contribution
If you are here it means you are considering contributing to Avalanche. It is thanks to people like you that we are making Avalanche a reality! 😍
In order to contribute the this awesome framework we recommend to go through the "From Zero to Hero" Avalanche Tutorial:
In this tutorial you'll learn Avalanche in-depth and learn how to extend and contribute back to the community! In particular, be sure to read the "Contribute to Avalanche" chapter:
At the moment, we don't have a lot of rules for contributing or a strict code of conduct, please enjoy this freedom with a grain of salt! 😁
Use a Multi-Head model: This example trains a Multi-head model on Split MNIST with Elastich Weight Consolidation. Each experience has a different task label, which is used at test time to select the appropriate head.
Augment impact and usability of your research products
The library is organized in five main modules:
Benchmarks: This module maintains a uniform API for data handling: mostly generating a stream of data from one or more datasets. It contains all the major CL benchmarks (similar to what has been done for torchvision).
Training: This module provides all the necessary utilities concerning model training. This includes simple and efficient ways of implement new continual learning strategies as well as a set pre-implemented CL baselines and state-of-the-art algorithms you will be able to use for comparison!
Evaluation: This modules provides all the utilities and metrics that can help evaluate a CL algorithm with respect to all the factors we believe to be important for a continually learning system.
Models: In this module you'll be able to find several model architectures and pre-trained models that can be used for your continual learning experiment (similar to what has been done in ).
Logging: It includes advanced logging and plotting features, including native stdout, file and support (How cool it is to have a complete, interactive dashboard, tracking your experiment metrics in real-time with a single line of code?)
Avalanche the first experiment of a End-to-end Library for reproducible continual learning research & development where you can find benchmarks, algorithms,evaluation metrics and much more, in the same place.
Let's make it together 👫 a wonderful ride! 🎈
Check out how your code changes when you start using Avalanche! 👇
🚦 Getting Started
We know that learning a new tool may be tough at first. This is why we made Avalanche as easy as possible to learn with a set of resources that will help you along the way.
For example, you may start with our 5-minutesguide that will let you acquire the basics about Avalanche and how you can use it in your research project:
We have also prepared for you a large set of examples & snippets you can plug-in directly into your code and play with:
Having completed these two sections, you will already feel with superpowers ⚡, this is why we have also created an in-depth tutorial that will cover all the aspect of Avalanche in details and make you a true Continual Learner! 👨🎓️
📑 Cite Avalanche
If you used Avalanche in your research project, please remember to cite our reference paper "Avalanche: an End-to-End Library for Continual Learning". This will help us make Avalanche better known in the machine learning community, ultimately making a better tool for everyone:
🗂️ Maintained by ContinualAI Lab
Avalanche is the flagship open-source collaborative project of ContinualAI: a non profit research organization and the largest open community on Continual Learning for AI.
Do you have a question, do you want to report an issue or simply ask for a new feature? Check out the Questions & Issues center. Do you want to improve Avalanche yourself? Follow these simple rules on How to Contribute.
The Avalanche project is maintained by the collaborative research team ContinualAI Laband used extensively by the Units of the ContinualAI Research (CLAIR) consortium, a research network of the major continual learning stakeholders around the world.
We are always looking for new awesome members willing to join the ContinualAI Lab, so check out our official website if you want to learn more about us and our activities, or contact us.
You can install also specific extra packages by specifying the appropriate code name within the square brackets. This is the complete list of options:
Avalanche will raise an error if you need one extra package and will suggest the appropriate package to install.
Note that in some alternatives to bash like zsh you may need to enclose `avalanche-lib[code]` into quotation marks ( " " ), since square brackets are used as special characters.
⬆️ Install the Master Branch Using Pip
If you want, you can install Avalanche directly from the master branch (latest version) in a single command. Make sure to have pytorch already installed in your environment, then execute
To update avalanche to the latest version, uninstall the package with pip uninstall avalanche-lib and then execute again the pip install command.
🐍 Install the Master Branch Using Anaconda
We suggest you to use the pip package, but if you need some recent features you may want to install directly from the master branch. In general, the master branch is well tested and safe to use. However, the API of new features may change more frequently or break backward compatibility. Reproducibility is also easier if you use the pip package.
On Linux, alternatively, you can simply run the install_environment.sh in the Avalanche home directory. The script takes 2 arguments: --python and --cuda_version. Check --help for details.
You can test your installation by running the examples/test_install.py script. Make sure to include avalanche into your $PYTHONPATH if you are running examples with the command line interface.
💻 Developer Mode Install
If you want to expand Avalanche and help us improve it (see the "From Zero to Hero" Tutorial). In this case we suggest to create an environment in developer-mode as follows (just a couple of more dependencies will be installed).
Assuming you have Anaconda (or Miniconda) installed on your system, you can follow these simple steps:
Install the avalanche-dev-env environment and activate it.
These three steps can be accomplished with the following lines of code:
On Linux, alternatively, you can simply run the install_environment_dev.sh in the Avalanche home directory. The script takes 2 arguments: --python and --cuda_version. Check --help for details.
You can test your installation by running the examples/test_install.py script. Make sure to include avalanche into your $PYTHONPATH if you are running examples with the command line interface.
That's it. now we have Avalanche up and running and we can start contribute to it!
🤝 Run it on Google Colab
You can run this chapter and play with it on Google Colaboratory:
Training: This module provides all the necessary utilities concerning model training. This includes simple and efficient ways of implement new continual learning strategies as well as a set pre-implemented CL baselines and state-of-the-art algorithms you will be able to use for comparison!
Evaluation: This module provides all the utilities and metrics that can help evaluate a CL algorithm with respect to all the factors we believe to be important for a continually learning system. It also includes advanced logging and plotting features, including native Tensorboard support.
Models: In this module you'll find several model architectures and pre-trained models that can be used for your continual learning experiment (similar to what has been done in torchvision.models). Furthermore, we provide everything you need to implement architectural strategies, task-aware models, and dynamic model expansion.
Logging: It includes advanced logging and plotting features, including native stdout, file and Tensorboard support (How cool it is to have a complete, interactive dashboard, tracking your experiment metrics in real-time with a single line of code?)
In this series of tutorials, you'll get the chance to learn in-depth all the features offered by each module and sub-module of Avalanche, how to put them together and how to master Avalanche, for a stress-free continual learning prototyping experience!
In the following tutorials we will assume you have already installed Avalanche on your computer or server. If you haven't yet, check out how you can do it following our How to Install guide.
🤝 Run it on Google Colab
You can run this chapter and play with it on Google Colaboratory:
Avalanche is a tool from the continual learning research community and for the continual learning research community. We try to keep the design of Avalanche as open, collaborative and inclusive as possible.
This is why we are always keen to hear your feedback about Avalanche! Join directly on slack (#avalanche channel) for a quick feedback or write a post on GitHub Discussions!
General Feedback Section of the Avalanche GitHub "Discussions" Tab.
Ask Your Question
To get Answers of Life, Ask Questions
We know that learning a new tool may be tough at times. This is why we are here to help you 🙏
Don't be afraid to ask questions, there are no stupid questions and we will always answer to you.
However, in order to help you, we need you to help us first.
First of all, if the question is more of a code issueplease use the GitHub Issues page.
For general questions, ideas,feature-requestsand discussions use GitHub Discussions.
If instead, this is a quick question about Avalanche or a request for support, in this case you can ask us directly (#avalanche channel).
In any case, please make sure to follow the steps below:
Clarify your information needs.
Formulate them coherently.
Check if the same question or a related one can be found.
Then, we will try to answer as swiftly as possible! 🤗
Evaluation
Protocols and Metrics Code Examples
Avalanche offers significant support for defining your own eveluation protocol (classic or custom metrics, when and on what to test). You can find examples related to the benchmarks here:
Eval Plugin: this is a simple example on how to use the Evaluation Plugin (the evaluation controller object)
: this example shows how to produce confusion matrix during training and evaluation.
: this is a simple example on how to use the Dataset inspection plugins.
: example usage of the mean_score helper to show the scores of the true class, averaged by new and old classes.
: this is a simple example on how to use the Evaluation Plugin with metrics returning values for different tasks.
Join Us!
Happiness is only Real when Shared
Do you want to make Avalanche more suitable for your own research project?Or maybe you just want to learn more about it and sharpen your coding skills in this area?
No matter the reasons, we are always looking for new members that can help help us improve Avalanche and make it a better tool for everyone!
Building something great together 👪 is fun and fulfilling 🎈. Joining our team you will also join a family of mentors and friends that can let you collaborate, have fun and ultimately achieve more in this area.
No matter your research or coding expertise level you may have, we believe anyone has her own strengths that can help us build a wonderful tool, being passion and time the fundamental ingredients.
So, don't hesitate to contact to learn more about how you can help. Do it now! 😊
Request a Feature
Help us Design Avalanche of the Future
Do you think an important feature is missing in Avalanche? You are in the right place!
We try to keep the design of Avalanche as open, collaborative and inclusive as possible. This means discussing Avalanche issues, development and future ideas openly through general ContinualAI projects meetups, its slack channel, Github and forum.
If you'd like to add a new feature to Avalanche please let us know, so we can work on it, or team up with you to make it a happen! 😄
Features request can be opened on the appropriate . Vote your preferred features and we will try to implement the most voted first!
Extending Avalanche
Make it Custom, Make it Yours
!pip install avalanche-lib==0.2.1
Having learned how to use all the Avalanche main features, you may end up willing to customize the framework a little to suit your eagerness of continually better functionalities (as a true continual learner would indeed do! ⚡).
Hence, now is the time to get your hands dirty! 🙌
Take you time to explore the Avalanche API in great detail. We made sure everything is well documented (even if improvable), but try to take a look at the code as well to resolve any uncertainties (of course if you have any question don't hesitate to ask)
We suggest to delve into the code using an appropriate IDE, such as PyCharm. This will help you navigate the code better and with tons of cool discovery features. Once you have a clear understanding of the entire codebase (or at least the module you'd like to extend/customize) you can start making changes.
If you think your changes may be interesting for the rest of the Continual Learning community, why not contributing back to Avalanche? You can learn how to do it in the next chapter.
🤝 Run it on Google Colab
You can run this chapter and play with it on Google Colaboratory:
import torch
from torch.nn import CrossEntropyLoss
from torch.optim import SGD

from avalanche.benchmarks.classic import PermutedMNIST
from avalanche.training.plugins import EvaluationPlugin
from avalanche.evaluation.metrics import accuracy_metrics
from avalanche.models import SimpleMLP
from avalanche.training.supervised import Naive

# Config
device = torch.device("cuda:0" if torch.cuda.is_available() else "cpu")

# model
model = SimpleMLP(num_classes=10)

# CL Benchmark Creation
perm_mnist = PermutedMNIST(n_experiences=3)
train_stream = perm_mnist.train_stream
test_stream = perm_mnist.test_stream

# Prepare for training & testing
optimizer = SGD(model.parameters(), lr=0.001, momentum=0.9)
criterion = CrossEntropyLoss()
eval_plugin = EvaluationPlugin(
    accuracy_metrics(minibatch=True, epoch=True, epoch_running=True,
                     experience=True, stream=True))

# Continual learning strategy
cl_strategy = Naive(
    model, optimizer, criterion, train_mb_size=32, train_epochs=2,
    eval_mb_size=32, evaluator=eval_plugin, device=device)

# train and test loop
results = []
for train_task in train_stream:
    cl_strategy.train(train_task, num_workers=4)
    results.append(cl_strategy.eval(test_stream))
import torch
import torch.nn as nn
from torch.nn import CrossEntropyLoss
from torch.optim import SGD
from torchvision import transforms
from torchvision.datasets import MNIST
from torchvision.transforms import ToTensor, RandomCrop
from torch.utils.data import DataLoader
import numpy as np
from copy import copy

# Config
device = torch.device("cuda:0" if torch.cuda.is_available() else "cpu")

# model
class SimpleMLP(nn.Module):

    def __init__(self, num_classes=10, input_size=28*28):
        super(SimpleMLP, self).__init__()

        self.features = nn.Sequential(
            nn.Linear(input_size, 512),
            nn.ReLU(inplace=True),
            nn.Dropout(),
        )
        self.classifier = nn.Linear(512, num_classes)
        self._input_size = input_size

    def forward(self, x):
        x = x.contiguous()
        x = x.view(x.size(0), self._input_size)
        x = self.features(x)
        x = self.classifier(x)
        return x
model = SimpleMLP(num_classes=10)

# CL Benchmark Creation
list_train_dataset = []
list_test_dataset = []
rng_permute = np.random.RandomState(0)
train_transform = transforms.Compose([
    RandomCrop(28, padding=4),
    ToTensor(),
    transforms.Normalize((0.1307,), (0.3081,))
])
test_transform = transforms.Compose([
    ToTensor(),
    transforms.Normalize((0.1307,), (0.3081,))
])

# permutation transformation
class PixelsPermutation(object):
    def __init__(self, index_permutation):
        self.permutation = index_permutation

    def __call__(self, x):
        return x.view(-1)[self.permutation].view(1, 28, 28)

def get_permutation():
    return torch.from_numpy(rng_permute.permutation(784)).type(torch.int64)

# for every incremental step
permutations = []
for i in range(3):
    # choose a random permutation of the pixels in the image
    idx_permute = get_permutation()
    current_perm = PixelsPermutation(idx_permute)
    permutations.append(idx_permute)

    # add the permutation to the default dataset transformation
    train_transform_list = train_transform.transforms.copy()
    train_transform_list.append(current_perm)
    new_train_transform = transforms.Compose(train_transform_list)

    test_transform_list = test_transform.transforms.copy()
    test_transform_list.append(current_perm)
    new_test_transform = transforms.Compose(test_transform_list)

    # get the datasets with the constructed transformation
    permuted_train = MNIST(root='./data/mnist',
                           download=True, transform=new_train_transform)
    permuted_test = MNIST(root='./data/mnist',
                    train=False,
                    download=True, transform=new_test_transform)
    list_train_dataset.append(permuted_train)
    list_test_dataset.append(permuted_test)

# Train
optimizer = SGD(model.parameters(), lr=0.001, momentum=0.9)
criterion = CrossEntropyLoss()

for task_id, train_dataset in enumerate(list_train_dataset):

    train_data_loader = DataLoader(
        train_dataset, num_workers=4, batch_size=32)

    for ep in range(2):
        for iteration, (train_mb_x, train_mb_y) in enumerate(train_data_loader):
            optimizer.zero_grad()
            train_mb_x = train_mb_x.to(device)
            train_mb_y = train_mb_y.to(device)

            # Forward
            logits = model(train_mb_x)
            # Loss
            loss = criterion(logits, train_mb_y)
            # Backward
            loss.backward()
            # Update
            optimizer.step()

# Test
acc_results = []
for task_id, test_dataset in enumerate(list_test_dataset):

    test_data_loader = DataLoader(
        test_dataset, num_workers=4, batch_size=32)

    correct = 0
    for iteration, (test_mb_x, test_mb_y) in enumerate(test_data_loader):

        # Move mini-batch data to device
        test_mb_x = test_mb_x.to(device)
        test_mb_y = test_mb_y.to(device)

        # Forward
        test_logits = model(test_mb_x)

        # Loss
        test_loss = criterion(test_logits, test_mb_y)

        # compute acc
        correct += test_mb_y.eq(test_logits.argmax(dim=1)).sum().item()

    acc_results.append(correct / len(test_dataset))
@InProceedings{lomonaco2021avalanche,
    title={Avalanche: an End-to-End Library for Continual Learning},
    author={Vincenzo Lomonaco and Lorenzo Pellegrini and Andrea Cossu and Antonio Carta and Gabriele Graffieti and Tyler L. Hayes and Matthias De Lange and Marc Masana and Jary Pomponi and Gido van de Ven and Martin Mundt and Qi She and Keiland Cooper and Jeremy Forest and Eden Belouadah and Simone Calderara and German I. Parisi and Fabio Cuzzolin and Andreas Tolias and Simone Scardapane and Luca Antiga and Subutai Amhad and Adrian Popescu and Christopher Kanan and Joost van de Weijer and Tinne Tuytelaars and Davide Bacciu and Davide Maltoni},
    booktitle={Proceedings of IEEE Conference on Computer Vision and Pattern Recognition},
    series={2nd Continual Learning in Computer Vision Workshop},
    year={2021}
}
pip install avalanche-lib
pip install avalanche-lib[all]
pip install avalanche-lib[extra] # supports for specific functionalities (e.g. specific strategies)
pip install avalanche-lib[rl] # reinforcement learning support
pip install avalanche-lib[detection] # object detection support
Feature-request section of the Avalanche GitHub "Discussions" Tab.
Models
First things first: let's start with a good model!
Welcome to the "Models" tutorial of the "From Zero to Hero" series. In this notebook we will talk about the features offered by the modelsAvalanche sub-module.
Support for pytorch Modules
Every continual learning experiment needs a model to train incrementally. You can use any torch.nn.Module, even pretrained models. The models sub-module provides for you the most commonly used architectures in the CL literature.
You can use any model provided in the official ecosystem models as well as the ones provided by !
Dynamic Model Expansion
A continual learning model may change over time. As an example, a classifier may add new units for previously unseen classes, while progressive networks add a new set units after each experience. Avalanche provides DynamicModules to support these use cases. DynamicModules are torch.nn.Modules that provide an addition method, adaptation, that is used to update the model's architecture. The method takes a single argument, the data from the current experience.
For example, an IncrementalClassifier updates the number of output units:
As you can see, after each call to the adaptation method, the model adds 2 new units to account for the new classes. Notice that no learning occurs at this point since the method only modifies the model's architecture.
Keep in mind that when you use Avalanche strategies you don't have to call the adaptation yourself. Avalanche strategies automatically call the model's adaptation and update the optimizer to include the new parameters.
Multi-Task models
Some models, such as multi-head classifiers, are designed to exploit task labels. In Avalanche, such models are implemented as MultiTaskModules. These are dynamic models (since they need to be updated whenever they encounter a new task) that have an additional task_labels argument in their forward method. task_labels is a tensor with a task id for each sample.
When you use a MultiHeadClassifier, a new head is initialized whenever a new task is encountered. Avalanche strategies automatically recognizes multi-task modules and provide the task labels to them.
How to define a multi-task Module
If you want to define a custom multi-task module you need to override two methods: adaptation (if needed), and forward_single_task. The forward method of the base class will split the mini-batch by task-id and provide single task mini-batches to forward_single_task.
Alternatively, if you only want to convert a single-head model into a multi-head model, you can use the as_multitask wrapper, which converts the model for you.
🤝 Run it on Google Colab
You can run this chapter and play with it on Google Colaboratory:
Training
Baselines and Strategies Code Examples
Avalanche offers significant support for training (with templates, strategies and plug-ins). Here you can find a list of examples related to the training and some strategies available in Avalanche (each strategy reproduces original paper results in the CL-Baselines repository:
Joint-Training: this example shows how to take a stream of experiences and train simultaneously on all of them. This is useful to implement the "offline" or "multi-task" upper bound.
: simple example on the usage of replay in Avalanche.
: this is a simple example on how to use the AR1 strategy.
: this is a simple example on how to use the CoPE plugin. It's an example in the online data incremental setting, where both learning and evaluation is completely task-agnostic.
: how to define your own cumulative strategy based on the different Data Loaders made available in Avalanche.
: this is a simple example on how to use the Deep SLDA strategy.
: this example shows how to use early stopping to dynamically stop the training procedure when the model converged instead of training for a fixed number of epochs.
: this example shows how to run object detection/segmentation tasks.
: this example shows how to run object detection/segmentation tasks with atoy benchmark based on the LVIS dataset.
: this example tests EWC on Split MNIST and Permuted MNIST.
: this example tests LWF on Permuted MNIST.
: this example shows how to use GEM and A-GEM strategies on MNIST.
: this example shows how to create a stream of pre-trained model from which to learn.
: this is a simple example on how to implement generative replay in Avalanche.
: simple example to show how to use the iCARL strategy.
: example on how to use a meta continual learning in Avalanche.
: example of the RWalk strategy usage.
: example to run a naive strategy in an online setting.
: this is a simple example on how to use the Synaptic Intelligence Plugin.
Putting All Together
Design Your Continual Learning Experiments
Welcome to the "Putting All Together" tutorial of the "From Zero to Hero" series. In this part we will summarize the major Avalanche features and how you can put them together for your continual learning experiments.
!pip install avalanche-lib==0.2.1
🛴 A Comprehensive Example
Here we report a complete example of the Avalanche usage:
🤝 Run it on Google Colab
You can run this chapter and play with it on Google Colaboratory:
Preamble: PyTorch Datasets
Few words about PyTorch Datasets
This short preamble will briefly go through the basic notions of Dataset offered natively by PyTorch. A solid grasp of these notions are needed to understand:
How PyTorch data loading works in general
How AvalancheDatasets differs from PyTorch Datasets
from torch.optim import SGD
from torch.nn import CrossEntropyLoss
from avalanche.benchmarks.classic import SplitMNIST
from avalanche.evaluation.metrics import forgetting_metrics, accuracy_metrics, \
    loss_metrics, timing_metrics, cpu_usage_metrics, confusion_matrix_metrics, disk_usage_metrics
from avalanche.models import SimpleMLP
from avalanche.logging import InteractiveLogger, TextLogger, TensorboardLogger
from avalanche.training.plugins import EvaluationPlugin
from avalanche.training.supervised import Naive

scenario = SplitMNIST(n_experiences=5)

# MODEL CREATION
model = SimpleMLP(num_classes=scenario.n_classes)

# DEFINE THE EVALUATION PLUGIN and LOGGERS
# The evaluation plugin manages the metrics computation.
# It takes as argument a list of metrics, collectes their results and returns
# them to the strategy it is attached to.

# log to Tensorboard
tb_logger = TensorboardLogger()

# log to text file
text_logger = TextLogger(open('log.txt', 'a'))

# print to stdout
interactive_logger = InteractiveLogger()

eval_plugin = EvaluationPlugin(
    accuracy_metrics(minibatch=True, epoch=True, experience=True, stream=True),
    loss_metrics(minibatch=True, epoch=True, experience=True, stream=True),
    timing_metrics(epoch=True, epoch_running=True),
    forgetting_metrics(experience=True, stream=True),
    cpu_usage_metrics(experience=True),
    confusion_matrix_metrics(num_classes=scenario.n_classes, save_image=False,
                             stream=True),
    disk_usage_metrics(minibatch=True, epoch=True, experience=True, stream=True),
    loggers=[interactive_logger, text_logger, tb_logger]
)

# CREATE THE STRATEGY INSTANCE (NAIVE)
cl_strategy = Naive(
    model, SGD(model.parameters(), lr=0.001, momentum=0.9),
    CrossEntropyLoss(), train_mb_size=500, train_epochs=1, eval_mb_size=100,
    evaluator=eval_plugin)

# TRAINING LOOP
print('Starting experiment...')
results = []
for experience in scenario.train_stream:
    print("Start of experience: ", experience.current_experience)
    print("Current Classes: ", experience.classes_in_this_experience)

    # train returns a dictionary which contains all the metric values
    res = cl_strategy.train(experience)
    print('Training completed')

    print('Computing accuracy on the whole test set')
    # test also returns a dictionary which contains all the metric values
    results.append(cl_strategy.eval(scenario.test_stream))
In PyTorch, a Dataset is a class exposing two methods:
__len__(), which returns the amount of instances in the dataset (as an int).
__getitem__(idx), which returns the data point at index idx.
In other words, a Dataset instance is just an object for which, similarly to a list, one can simply:
Obtain its length using the Python len(dataset) function.
Obtain a single data point using the x, y = dataset[idx] syntax.
The content of the dataset can be either loaded in memory when the dataset is instantiated (like the torchvision MNIST dataset does) or, for big datasets like ImageNet, the content is kept on disk, with the dataset keeping the list of files in an internal field. In this case, data is loaded from the storage on-the-fly when __getitem__(idx) is called. The way those things are managed is specific to each dataset implementation.
PyTorch Datasets
The PyTorch library offers 4 Dataset implementations:
Dataset: an interface defining the __len__ and __getitem__ methods.
TensorDataset: instantiated by passing X and Y tensors. Each row of the X and Y tensors is interpreted as a data point. The __getitem__(idx) method will simply return the idx-th row of X and Y tensors.
ConcatDataset: instantiated by passing a list of datasets. The resulting dataset is a concatenation of those datasets.
Subset: instantiated by passing a dataset and a list of indices. The resulting dataset will only contain the data points described by that list of indices.
As explained in the mini How-Tos, Avalanche offers a customized version for all these 4 datasets.
Transformations
Most datasets from the torchvision libraries (as well as datasets found "in the wild") allow for a transformation function to be passed to the dataset constructor. The support for transformations is not mandatory for a dataset, but it is quite common to support them. The transformation is used to process the X value of a data point before returning it. This is used to normalize values, apply augmentations, etcetera.
As explained in the mini How-Tos, the AvalancheDataset class implements a very rich and powerful set of functionalities for managing transformations.
Quick note on the IterableDataset class
A variation of the standard Dataset exist in PyTorch: the IterableDataset. When using an IterableDataset, one can load the data points in a sequential way only (by using a tape-alike approach). The dataset[idx] syntax and len(dataset) function are not allowed. Avalanche does NOT support IterableDatasets. You shouldn't worry about this because, realistically, you will never encounter such datasets.
DataLoader
The Dataset is a very simple object that only returns one data point given its index. In order to create minibatches and speed-up the data loading process, a DataLoader is required.
The PyTorch DataLoader class is a very efficient mechanism that, given a Dataset, will return minibatches by optonally shuffling data brefore each epoch and by loading data in parallel by using multiple workers.
Preamble wrap-up
To wrap-up, let's see how the native, non-Avalanche, PyTorch components work in practice. In the following code we create a TensorDataset and then we load it in minibatches using a DataLoader.
Next steps
With these notions in mind, you can start start your journey on understanding the functionalities offered by the AvalancheDatasets by going through the Mini How-Tos.
Welcome to the "Logging" tutorial of the "From Zero to Hero" series. In this part we will present the functionalities offered by the Avalanchelogging module.
📑 The Logging Module
In the previous tutorial we have learned how to evaluate a continual learning algorithm in Avalanche, through different metrics that can be used off-the-shelf via the Evaluation Plugin or stand-alone. However, computing metrics and collecting results, may not be enough at times.
While running complex experiments with long waiting times, logging results over-time is fundamental to "babysit" your experiments in real-time, or even understand what went wrong in the aftermath.
This is why in Avalanche we decided to put a strong emphasis on logging and provide a number of loggers that can be used with any set of metrics!
Loggers
Avalanche at the moment supports four main Loggers:
InteractiveLogger: This logger provides a nice progress bar and displays real-time metrics results in an interactive way (meant for stdout).
TextLogger: This logger, mostly intended for file logging, is the plain text version of the InteractiveLogger. Keep in mind that it may be very verbose.
In order to keep track of when each metric value has been logged, we leverage two global counters, one for the training phase, one for the evaluation phase. You can see the global counter value reported in the x axis of the logged plots.
Each global counter is an ever-increasing value which starts from 0 and it is increased by one each time a training/evaluation iteration is performed (i.e. after each training/evaluation minibatch). The global counters are updated automatically by the strategy.
How to use loggers
Create your Logger
If the available loggers are not sufficient to suit your needs, you can always implement a custom logger by specializing the behaviors of the StrategyLogger base class.
This completes the "Logging" tutorial for the "From Zero to Hero" series. We hope you enjoyed it!
🤝 Run it on Google Colab
You can run this chapter and play with it on Google Colaboratory:
The People
All the People that Made Avalanche Great
Avalanche: Coming soon to your computer screens! 😂
🗂️ Maintainers
The Project is maintained mostly by ContinualAI Lab members, with the core mission of supporting the production, organization and dissemination of original research on CL with technical research, open source projects and tools that can make the life of a CL researcher easier.
(Lead Mantainer)
(Mantainer)
(Mantainer)
(Mantainer)
(Mantainer)
(Project Manager)
🔨 Contributors
Avalanche is a large community effort. It is only fair to list here all the people who made it a great tool that anyone can use without any restrictions at all!
Tyler Hayes, Matthias De Lange, Marc Masana, Jary Pomponi, Gido van de Ven, Martin Mundt, Qi She, Keiland Cooper, Jeremy Forest, Eden Belouadah, Adrian Popescu, Andreas Tolias, Fabio Cuzzolin, Simone Scardapane, Simone Calderara, Subutai Amhad, Luca Antiga, Christopher Kanan, Joost van de Weijer, Tinne Tuytelaars, Davide Bacciu, German I. Parisi, Razvan Pascanu, Davide Maltoni...see the!
👪 Users
Avalanche is a great tool also thanks to its many users. Here we list some research groups using Avalanche for their continual learning research:
(PI: Vincenzo Lomonaco)
(PI: Davide Bacciu)
(PI: Davide Maltoni, University of Bologna)
📫 Contacts
If you want to contact us don't hesitate to send an email to [email protected], [email protected], or you can join us and chat with us all! 😃
Contribute to Avalanche
How to Contribute Back to the Avalanche Community
The last step to become a real continual learning super-hero ⚡ is to fall into a radioactive dump.☢️ Just kidding, it's much easier than that: you need to contribute back to Avalanche!
There are no superheroes that are not altruistic!
In order to contribute to Avalanche, first of all you need to become familiar with all its features and the codebase structure, so if you have not followed the "From Zero to Hero Tutorial" from the beginning we suggest to do it before starting to make changes.
First of all, if you haven't already. After you've familiarized with the Avalanche codebase you have two roads ahead of you:
You can start working on a (we have dozen of them!)
You can and propose yourself to work on it.
In any of the two cases you'd need to follow the steps below:
and #avalanche-dev channel (optional but recommended)
⭐Star + 👁️ watch the repository.
Fork the repository.
The following rules should be respected:
Use PEP8 coding style and work within the 80 columns limit.
Always pull before pushing a commit.
Try to assign to yourself one issue at a time.
Also, before making your PR make sure that the following commands return without any errors:
Otherwise fix them and run again these commands until everything is working correctly. You should also check if everything is working on GPUs, using the env variable USE_GPU=True:
Faster integrity checks can be run with the env variable FAST_TEST=True :
Contribute to the Avalanche documentation
Apart from the code, you can also contribute to the Avalanche documentation 📚! We use to write the documentation, so both code and text can be smoothly inserted, and, as you may have noticed, all our documentation can be run on !
To contribute to the documentation you need to follow the steps below:
The notebooks are contained in the folder notebooks. The folder structure is specular to the documentation, so do not create or delete any folder.
Detect the notebook that you want to edit and do all the modifications 📝
Commit the changes and open a pull request (PR).
🤝 Run it on Google Colab
You can run this chapter and play with it on Google Colaboratory:
import torch
from torch.utils.data.dataset import TensorDataset
from torch.utils.data.dataloader import DataLoader

# Create a dataset of 100 data points described by 22 features + 1 class label
x_data = torch.rand(100, 22)
y_data = torch.randint(0, 5, (100,))

# Create the Dataset
my_dataset = TensorDataset(x_data, y_data)

# Create the DataLoader
my_dataloader = DataLoader(my_dataset, batch_size=10, shuffle=True, num_workers=4)

# Run one epoch
for x_minibatch, y_minibatch in my_dataloader:
    print('Loaded minibatch of', len(x_minibatch), 'instances')
# Output: "Loaded minibatch of 10 instances" x10 times
!pip install avalanche-lib==0.2.1
from avalanche.models import SimpleCNN
from avalanche.models import SimpleMLP
from avalanche.models import SimpleMLP_TinyImageNet
from avalanche.models import MobilenetV1

model = SimpleCNN()
print(model)
from avalanche.benchmarks import SplitMNIST
from avalanche.models import IncrementalClassifier

benchmark = SplitMNIST(5, shuffle=False)
model = IncrementalClassifier(in_features=784)

print(model)
for exp in benchmark.train_stream:
    model.adaptation(exp)
    print(model)
from avalanche.benchmarks import SplitMNIST
from avalanche.models import MultiHeadClassifier

benchmark = SplitMNIST(5, shuffle=False, return_task_id=True)
model = MultiHeadClassifier(in_features=784)

print(model)
for exp in benchmark.train_stream:
    model.adaptation(exp)
    print(model)
from avalanche.models import MultiTaskModule

class CustomMTModule(MultiTaskModule):
    def __init__(self, in_features, initial_out_features=2):
        super().__init__()

    def adaptation(self, dataset):
        super().adaptation(dataset)
        # your adaptation goes here

    def forward_single_task(self, x, task_label):
        # your forward goes here.
        # task_label is a single integer
        # the mini-batch is split by task-id inside the forward method.
        pass
from avalanche.models import as_multitask

model = SimpleCNN()
print(model)

mt_model = as_multitask(model, 'classifier')
print(mt_model)
!pip install avalanche-lib==0.2.1
TensorboardLogger: It logs all the metrics on Tensorboard in real-time. Perfect for real-time plotting.
WandBLogger: It leverages Weights and Biases tools to log metrics and results on a dashboard. It requires a W&B account.
Try closing an issue within roughly 7 days. If you are not able to do that, please break it down into multiple ones you can tackle more easily, or you can always remove your assignment to the issue!
If you add a new feature, please include also a test and a usage example in your PR.
If your pull request will be accepted, your edited notebooks will be automatically converted and uploaded to the official Avalanche website 🎊!
Avalanche provides several components that help you to balance data loading and implement rehearsal strategies.
Dataloaders are used to provide balancing between groups (e.g. tasks/classes/experiences). This is especially useful when you have unbalanced data.
Buffers are used to store data from the previous experiences. They are dynamic datasets with a fixed maximum size, and they can be updated with new data continuously.
Finally, Replay strategies implement rehearsal by using Avalanche's plugin system. Most rehearsal strategies use a custom dataloader to balance the buffer with the current experience and a buffer that is updated for each experience.
First, let's install Avalanche. You can skip this step if you have installed it already.
from torch.optim import SGD
from torch.nn import CrossEntropyLoss
from avalanche.benchmarks.classic import SplitMNIST
from avalanche.evaluation.metrics import forgetting_metrics, \
accuracy_metrics, loss_metrics, timing_metrics, cpu_usage_metrics, \
confusion_matrix_metrics, disk_usage_metrics
from avalanche.models import SimpleMLP
from avalanche.logging import InteractiveLogger, TextLogger, TensorboardLogger, WandBLogger
from avalanche.training.plugins import EvaluationPlugin
from avalanche.training import Naive

benchmark = SplitMNIST(n_experiences=5, return_task_id=False)

# MODEL CREATION
model = SimpleMLP(num_classes=benchmark.n_classes)

# DEFINE THE EVALUATION PLUGIN and LOGGERS
# The evaluation plugin manages the metrics computation.
# It takes as argument a list of metrics, collectes their results and returns
# them to the strategy it is attached to.


loggers = []

# log to Tensorboard
loggers.append(TensorboardLogger())

# log to text file
loggers.append(TextLogger(open('log.txt', 'a')))

# print to stdout
loggers.append(InteractiveLogger())

# W&B logger - comment this if you don't have a W&B account
loggers.append(WandBLogger(project_name="avalanche", run_name="test"))

eval_plugin = EvaluationPlugin(
    accuracy_metrics(minibatch=True, epoch=True, experience=True, stream=True),
    loss_metrics(minibatch=True, epoch=True, experience=True, stream=True),
    timing_metrics(epoch=True, epoch_running=True),
    cpu_usage_metrics(experience=True),
    forgetting_metrics(experience=True, stream=True),
    confusion_matrix_metrics(num_classes=benchmark.n_classes, save_image=True,
                             stream=True),
    disk_usage_metrics(minibatch=True, epoch=True, experience=True, stream=True),
    loggers=loggers,
    benchmark=benchmark
)

# CREATE THE STRATEGY INSTANCE (NAIVE)
cl_strategy = Naive(
    model, SGD(model.parameters(), lr=0.001, momentum=0.9),
    CrossEntropyLoss(), train_mb_size=500, train_epochs=1, eval_mb_size=100,
    evaluator=eval_plugin)

# TRAINING LOOP
print('Starting experiment...')
results = []
for experience in benchmark.train_stream:
    # train returns a dictionary which contains all the metric values
    res = cl_strategy.train(experience)
    print('Training completed')

    print('Computing accuracy on the whole test set')
    # test also returns a dictionary which contains all the metric values
    results.append(cl_strategy.eval(benchmark.test_stream))
# need to manually call W&B run end since we are in a notebook
import wandb
wandb.finish()
Avalanche dataloaders are simple iterators, located under avalanche.benchmarks.utils.data_loader. Their interface is equivalent to pytorch's dataloaders. For example, GroupBalancedDataLoader takes a sequence of datasets and iterates over them by providing balanced mini-batches, where the number of samples is split equally among groups. Internally, it instantiate a DataLoader for each separate group. More specialized dataloaders exist such as TaskBalancedDataLoader.
All the dataloaders accept keyword arguments (**kwargs) that are passed directly to the dataloaders for each group.
Memory Buffers
Memory buffers store data up to a maximum capacity, and they implement policies to select which data to store and which the to remove when the buffer is full. They are available in the module avalanche.training.storage_policy. The base class is the ExemplarsBuffer, which implements two methods:
update(strategy) - given the strategy's state it updates the buffer (using the data in strategy.experience.dataset).
resize(strategy, new_size) - updates the maximum size and updates the buffer accordingly.
The data can be access using the attribute buffer.
At first, the buffer is empty. We can update it with data from a new experience.
Notice that we use a SimpleNamespace because we want to use the buffer standalone, without instantiating an Avalanche strategy. Reservoir sampling requires only the experience from the strategy's state.
Notice after each update some samples are substituted with new data. Reservoir sampling select these samples randomly.
Avalanche offers many more storage policies. For example, ParametricBuffer is a buffer split into several groups according to the groupby parameters (None, 'class', 'task', 'experience'), and according to an optional ExemplarsSelectionStrategy (random selection is the default choice).
The advantage of using grouping buffers is that you get a balanced rehearsal buffer. You can even access the groups separately with the buffer_groups attribute. Combined with balanced dataloaders, you can ensure that the mini-batches stay balanced during training.
Replay Plugins
Avalanche's strategy plugins can be used to update the rehearsal buffer and set the dataloader. This allows to easily implement replay strategies:
And of course, we can use the plugin to train our continual model
!pip install avalanche-lib
from avalanche.benchmarks import SplitMNIST
from avalanche.benchmarks.utils.data_loader import GroupBalancedDataLoader
benchmark = SplitMNIST(5, return_task_id=True)

dl = GroupBalancedDataLoader([exp.dataset for exp in benchmark.train_stream], batch_size=4)
for x, y, t in dl:
    print(t.tolist())
    break
from avalanche.training.storage_policy import ReservoirSamplingBuffer
from types import SimpleNamespace

benchmark = SplitMNIST(5, return_task_id=False)
storage_p = ReservoirSamplingBuffer(max_size=30)

print(f"Max buffer size: {storage_p.max_size}, current size: {len(storage_p.buffer)}")
for i in range(5):
    strategy_state = SimpleNamespace(experience=benchmark.train_stream[i])
    storage_p.update(strategy_state)
    print(f"Max buffer size: {storage_p.max_size}, current size: {len(storage_p.buffer)}")
    print(f"class targets: {storage_p.buffer.targets}\n")
from avalanche.training.storage_policy import ParametricBuffer, RandomExemplarsSelectionStrategy
storage_p = ParametricBuffer(
    max_size=30,
    groupby='class',
    selection_strategy=RandomExemplarsSelectionStrategy()
)

print(f"Max buffer size: {storage_p.max_size}, current size: {len(storage_p.buffer)}")
for i in range(5):
    strategy_state = SimpleNamespace(experience=benchmark.train_stream[i])
    storage_p.update(strategy_state)
    print(f"Max buffer size: {storage_p.max_size}, current size: {len(storage_p.buffer)}")
    print(f"class targets: {storage_p.buffer.targets}\n")
for k, v in storage_p.buffer_groups.items():
    print(f"(group {k}) -> size {len(v.buffer)}")
datas = [v.buffer for v in storage_p.buffer_groups.values()]
dl = GroupBalancedDataLoader(datas)

for x, y, t in dl:
    print(y.tolist())
    break
from avalanche.benchmarks.utils.data_loader import ReplayDataLoader
from avalanche.training.plugins import StrategyPlugin

class CustomReplay(StrategyPlugin):
    def __init__(self, storage_policy):
        super().__init__()
        self.storage_policy = storage_policy

    def before_training_exp(self, strategy,
                            num_workers: int = 0, shuffle: bool = True,
                            **kwargs):
        """ Here we set the dataloader. """
        if len(self.storage_policy.buffer) == 0:
            # first experience. We don't use the buffer, no need to change
            # the dataloader.
            return

        # replay dataloader samples mini-batches from the memory and current
        # data separately and combines them together.
        print("Override the dataloader.")
        strategy.dataloader = ReplayDataLoader(
            strategy.adapted_dataset,
            self.storage_policy.buffer,
            oversample_small_tasks=True,
            num_workers=num_workers,
            batch_size=strategy.train_mb_size,
            shuffle=shuffle)

    def after_training_exp(self, strategy: "BaseStrategy", **kwargs):
        """ We update the buffer after the experience.
            You can use a different callback to update the buffer in a different place
        """
        print("Buffer update.")
        self.storage_policy.update(strategy, **kwargs)
from torch.nn import CrossEntropyLoss
from avalanche.training import Naive
from avalanche.evaluation.metrics import accuracy_metrics
from avalanche.training.plugins import EvaluationPlugin
from avalanche.logging import InteractiveLogger
from avalanche.models import SimpleMLP
import torch

scenario = SplitMNIST(5)
model = SimpleMLP(num_classes=scenario.n_classes)
storage_p = ParametricBuffer(
    max_size=500,
    groupby='class',
    selection_strategy=RandomExemplarsSelectionStrategy()
)

# choose some metrics and evaluation method
interactive_logger = InteractiveLogger()

eval_plugin = EvaluationPlugin(
    accuracy_metrics(experience=True, stream=True),
    loggers=[interactive_logger])

# CREATE THE STRATEGY INSTANCE (NAIVE)
cl_strategy = Naive(model, torch.optim.Adam(model.parameters(), lr=0.001),
                    CrossEntropyLoss(),
                    train_mb_size=100, train_epochs=1, eval_mb_size=100,
                    plugins=[CustomReplay(storage_p)],
                    evaluator=eval_plugin
                    )

# TRAINING LOOP
print('Starting experiment...')
results = []
for experience in scenario.train_stream:
    print("Start of experience ", experience.current_experience)
    cl_strategy.train(experience)
    print('Training completed')

    print('Computing accuracy on the whole test set')
    results.append(cl_strategy.eval(scenario.test_stream))
Creation and manipulation of AvalancheDatasets and its subclasses.
The AvalancheDataset is an implementation of the PyTorch Dataset class which comes with many out-of-the-box functionalities. The AvalancheDataset (an its few subclass) are extensively used through the whole Avalanche library as the reference way to manipulate datasets:
The dataset carried by the experience.dataset field is always an AvalancheDataset.
Benchmark creation functions accept AvalancheDatasets to create benchmarks where a finer control over task labels is required.
Internally, benchmarks are created by manipulating AvalancheDatasets.
This first Mini How-To will guide through the main ways you can use to instantiate an AvalancheDataset while the other Mini How-Tos () will show how to use its functionalities.
It is warmly recommended to run this page as a notebook using Colab (info at the bottom of this page).
Let's start by installing avalanche:
AvalancheDataset vs PyTorch Dataset
This mini How-To will guide you through the main ways used to instantiate an AvalancheDataset.
First thing: the base class AvalancheDataset is a wrapper for existing datasets. Only two things must be considered when wrapping an existing dataset:
Apart from the x and y values, the resulting AvalancheDataset will also return a third value: the task label (which defaults to 0).
The wrapped dataset must contain a valid targets field.
The targets field is available is nearly all torchvision datasets. It must be a list containing the label for each data point (usually the y value). In this way, Avalanche can use that field when instantiating benchmarks like the "Class/Task-Incremental* and Domain-Incremental ones.
Avalanche exposes 4 classes of AvalancheDatasets which map exactly the 4 Dataset classes offered by PyTorch:
AvalancheDataset: the base class, which acts a wrapper to existing Dataset instances.
AvalancheTensorDataset: equivalent to PyTorch TesnsorDataset.
🛠️ Create an AvalancheDataset
Given a dataset (like MNIST), an AvalancheDataset can be instantiated as follows:
Just like any other Dataset, a data point can be obtained using the x, y = dataset[idx] syntax. When obtaining a data point from an AvalancheDataset, an additional third value (the task label) will be returned:
Useful tip: if you are not sure if you are dealing with a PyTorch Dataset or an AvalancheDataset, or if you want to ignore task labels, you can use this syntax:
The AvalancheTensorDataset
The PyTorch TensorDataset is one of the most useful Dataset classes as it can be used to quickly prototype the data loading part of your code.
A TensorDataset can be wrapped in an AvalancheDataset just like any Dataset, but this is not much convenient, as shown below:
Instead, it is recommended to use the AvalancheTensorDataset class to get the same result. In this way, you can just skip one intermediate step.
In both cases, AvalancheDataset will automatically populate its targets field by using the values from the second Tensor (which usually contains the Y values). This behaviour can be customized by passing a custom targets constructor parameter (by either passing a list of targets or the index of the Tensor to use).
The cell below shows the content of the target field of the dataset created in the cell above. Notice that the targets field has been filled with the content of the second Tensor (y_data).
The AvalancheSubset and AvalancheConcatDataset classes
Avalanche offers the AvalancheSubset and AvalancheConcatDataset implementations that extend the functionalities of PyTorch Subset and ConcatDataset.
Regarding the subsetting operation, AvalancheSubset behaves in the same way the PyTorch Subset class does: both implementations accept a dataset and a list of indices as parameters. The resulting Subset is not a copy of the dataset, it's just a view. This is similar to creating a view of a NumPy array by passing a list of indexes using the numpy_array[list_of_indices] syntax. This can be used to both create a smaller dataset and to change the order of data points in the dataset.
Here we create a toy dataset in which each X and Y values are ints. We then obtain a subset of it by creating an AvalancheSubset:
Concatenation is even simpler. Just like with PyTorch ConcatDataset, one can easily concatentate datasets with AvalancheConcatDataset.
Both AvalancheConcatDataset and PyTorch ConcatDataset accept a list of datasets to concatenate.
Dataset Creation wrap-up
This Mini How-To showed you how to create instances of AvalancheDataset (and its subclasses).
Other Mini How-Tos will guide you through the functionalities offered by AvalancheDataset. The list of Mini How-Tos can be found .
🤝 Run it on Google Colab
You can run this chapter and play with it on Google Colaboratory by clicking here:
from avalanche.benchmarks.utils import AvalancheDataset
from torchvision.datasets import MNIST

# Instantiate the MNIST train dataset from torchvision
mnist_dataset = MNIST('mnist_data', download=True)

# Create the AvalancheDataset
mnist_avalanche_dataset = AvalancheDataset(mnist_dataset)
# Obtain the first instance from the original dataset
x, y = mnist_dataset[0]
print(f'x={x}, y={y}')
# Output: "x=<PIL.Image.Image image mode=L size=28x28 at 0x7FBEDFDB2430>, y=5"

# Obtain the first instance from the AvalancheDataset
x, y, t = mnist_avalanche_dataset[0]
print(f'x={x}, y={y}, t={t}')
# Output: "x=<PIL.Image.Image image mode=L size=28x28 at 0x7FBEEFD3A850>, y=5, t=0"
# You can use "x, y, *_" to manage both kinds of Datasets
x, y, *_ = mnist_dataset[0]  # OK
x, y, *_ = mnist_avalanche_dataset[0]  # OK
import torch
from torch.utils.data import TensorDataset


# Create 10 instances described by 7 features
x_data = torch.rand(10, 7)

# Create the class labels for the 10 instances
y_data = torch.randint(0, 5, (10,))

# Create the tensor dataset
tensor_dataset = TensorDataset(x_data, y_data)

# Wrap it in an AvalancheDataset
wrapped_tensor_dataset = AvalancheDataset(tensor_dataset)

# Obtain the first instance from the dataset
x, y, t = wrapped_tensor_dataset[0]
print(f'x={x}, y={y}, t={t}')
# Output: "x=tensor([0.6329, 0.8495, 0.1853, 0.7254, 0.7893, 0.8079, 0.1106]), y=4, t=0"
from avalanche.benchmarks.utils import AvalancheTensorDataset

# Create the tensor dataset
avl_tensor_dataset = AvalancheTensorDataset(x_data, y_data)

# Obtain the first instance from the AvalancheTensorDataset
x, y, t = avl_tensor_dataset[0]
print(f'x={x}, y={y}, t={t}')
# Output: "x=tensor([0.6329, 0.8495, 0.1853, 0.7254, 0.7893, 0.8079, 0.1106]), y=4, t=0"
from avalanche.benchmarks.utils import AvalancheSubset

# Define the X values of 10 instances (each instance is an int)
x_data_toy = [50, 51, 52, 53, 54, 55, 56, 57, 58, 59]

# Define the class labels for the 10 instances
y_data_toy = [10, 11, 12, 13, 14, 15, 16, 17, 18, 19]

# Create  the tensor dataset
# Note: AvalancheSubset can also be applied to PyTorch TensorDataset directly!
# However, note that PyTorch TensorDataset doesn't support Python lists...
# ... (it only supports Tensors) while AvalancheTensorDataset does.
toy_dataset = AvalancheTensorDataset(x_data_toy, y_data_toy)

# Define the indices for the subset
# Here we want to obtain a subset containing only the data points...
# ... at indices 0, 5, 8, 2 (in this specific order)
subset_indices = [0, 5, 8, 2]

# Create the subset
avl_subset = AvalancheSubset(toy_dataset, indices=subset_indices)
print('The subset contains', len(avl_subset), 'instances.')
# Output: "The subset contains 4 instances."

# Obtain instances from the AvalancheSubset
for x, y, t in avl_subset:
    print(f'x={x}, y={y}, t={t}')
# Output:
# x=50, y=10, t=0
# x=55, y=15, t=0
# x=58, y=18, t=0
# x=52, y=12, t=0
from avalanche.benchmarks.utils import AvalancheConcatDataset

# Define the 2 datasets to be concatenated
x_data_toy_1 = [50, 51, 52, 53, 54]
y_data_toy_1 = [10, 11, 12, 13, 14]
x_data_toy_2 = [60, 61, 62, 63, 64]
y_data_toy_2 = [20, 21, 22, 23, 24]

# Create the datasets
toy_dataset_1 = AvalancheTensorDataset(x_data_toy_1, y_data_toy_1)
toy_dataset_2 = AvalancheTensorDataset(x_data_toy_2, y_data_toy_2)

# Create the concat dataset
avl_concat = AvalancheConcatDataset([toy_dataset_1, toy_dataset_2])
print('The concat dataset contains', len(avl_concat), 'instances.')
# Output: "The concat dataset contains 10 instances."

# Obtain instances from the AvalancheConcatDataset
for x, y, t in avl_concat:
    print(f'x={x}, y={y}, t={t}')
# Output:
# x=51, y=11, t=0
# x=52, y=12, t=0
# x=53, y=13, t=0
# x=54, y=14, t=0
# x=60, y=20, t=0
# x=61, y=21, t=0
# x=62, y=22, t=0
# x=63, y=23, t=0
# x=64, y=24, t=0
Evaluation
Automatic Evaluation with Pre-implemented Metrics
Welcome to the "Evaluation" tutorial of the "From Zero to Hero" series. In this part we will present the functionalities offered by the evaluation module.
📈 The Evaluation Module
The evaluation module is quite straightforward: it offers all the basic functionalities to evaluate and keep track of a continual learning experiment.
This is mostly done through the Metrics: a set of classes which implement the main continual learning metrics computation like A_ccuracy_, F_orgetting_, M_emory Usage_, R_unning Times_, etc. At the moment, in Avalanche we offer a number of pre-implemented metrics you can use for your own experiments. We made sure to include all the major accuracy-based metrics but also the ones related to computation and memory.
Each metric comes with a standalone class and a set of plugin classes aimed at emitting metric values on specific moments during training and evaluation.
Standalone metric
As an example, the standalone Accuracy class can be used to monitor the average accuracy over a stream of <input,target> pairs. The class provides an update method to update the current average accuracy, a result method to print the current average accuracy and a reset method to set the current average accuracy to zero. The call to resultdoes not change the metric state.
The Accuracy metric requires the task_labels parameter, which specifies which task is associated with the current patterns. The metric returns a dictionary mapping task labels to accuracy values.
Plugin metric
If you want to integrate the available metrics automatically in the training and evaluation flow, you can use plugin metrics, like EpochAccuracy which logs the accuracy after each training epoch, or ExperienceAccuracy which logs the accuracy after each evaluation experience. Each of these metrics emits a curve composed by its values at different points in time (e.g. on different training epochs). In order to simplify the use of these metrics, we provided utility functions with which you can create different plugin metrics in one shot. The results of these functions can be passed as parameters directly to the EvaluationPlugin(see below).
We recommend to use the helper functions when creating plugin metrics.
📐Evaluation Plugin
The Evaluation Plugin is the object in charge of configuring and controlling the evaluation procedure. This object can be passed to a Strategy as a "special" plugin through the evaluator attribute.
The Evaluation Plugin accepts as inputs the plugin metrics you want to track. In addition, you can add one or more loggers to print the metrics in different ways (on file, on standard output, on Tensorboard...).
It is also recommended to pass to the Evaluation Plugin the benchmark instance used in the experiment. This allows the plugin to check for consistency during metrics computation. For example, the Evaluation Plugin checks that the strategy.eval calls are performed on the same stream or sub-stream. Otherwise, same metric could refer to different portions of the stream.
These checks can be configured to raise errors (stopping computation) or only warnings.
Implement your own metric
To implement a standalone metric, you have to subclass Metric class.
To implement a plugin metric you have to subclass PluginMetric class
Accessing metric values
If you want to access all the metrics computed during training and evaluation, you have to make sure that collect_all=True is set when creating the EvaluationPlugin (default option is True). This option maintains an updated version of all metric results in the plugin, which can be retrieved by calling evaluation_plugin.get_all_metrics(). You can call this methods whenever you need the metrics.
The result is a dictionary with full metric names as keys and a tuple of two lists as values. The first list stores all the x values recorded for that metric. Each x value represents the time step at which the corresponding metric value has been computed. The second list stores metric values associated to the corresponding x value.
Alternatively, the train and eval method of every strategy returns a dictionary storing, for each metric, the last value recorded for that metric. You can use these dictionaries to incrementally accumulate metrics.
This completes the "Evaluation" tutorial for the "From Zero to Hero" series. We hope you enjoyed it!
🤝 Run it on Google Colab
You can run this chapter and play with it on Google Colaboratory:
Training
Continual Learning Algorithms Prototyping Made Easy
Welcome to the "Training" tutorial of the "From Zero to Hero" series. In this part we will present the functionalities offered by the training module.
First, let's install Avalanche. You can skip this step if you have installed it already.
💪 The Training Module
!pip install avalanche-lib==0.2.1
The
training
module in
Avalanche
is designed with modularity in mind. Its main goals are to:
provide a set of popular continual learning baselines that can be easily used to run experimental comparisons;
provide simple abstractions to create and run your own strategy as efficiently and easily as possible starting from a couple of basic building blocks we already prepared for you.
At the moment, the training module includes three main components:
Templates: these are high level abstractions used as a starting point to define the actual strategies. The templates contain already implemented basic utilities and functionalities shared by a group of strategies (e.g. the BaseSGDTemplate contains all the implemented methods to deal with strategies based on SGD).
Strategies: these are popular baselines already implemented for you which you can use for comparisons or as base classes to define a custom strategy.
Plugins: these are classes that allow to add some specific behaviour to your own strategy. The plugin system allows to define reusable components which can be easily combined (e.g. a replay strategy, a regularization strategy). They are also used to automatically manage logging and evaluation.
Keep in mind that many Avalanche components are independent of Avalanche strategies. If you already have your own strategy which does not use Avalanche, you can use Avalanche's benchmarks, models, data loaders, and metrics without ever looking at Avalanche's strategies!
📈 How to Use Strategies & Plugins
If you want to compare your strategy with other classic continual learning algorithm or baselines, in Avalanche you can instantiate a strategy with a couple lines of code.
Strategy Instantiation
Most strategies require only 3 mandatory arguments:
model: this must be a torch.nn.Module.
optimizer: torch.optim.Optimizer already initialized on your model.
loss: a loss function such as those in torch.nn.functional.
Additional arguments are optional and allow you to customize training (batch size, number of epochs, ...) or strategy-specific parameters (memory size, regularization strength, ...).
Training & Evaluation
Each strategy object offers two main methods: train and eval. Both of them, accept either a single experience(Experience) or a list of them, for maximum flexibility.
We can train the model continually by iterating over the train_stream provided by the scenario.
Adding Plugins
Most continual learning strategies follow roughly the same training/evaluation loops, i.e. a simple naive strategy (a.k.a. finetuning) augmented with additional behavior to counteract catastrophic forgetting. The plugin systems in Avalanche is designed to easily augment continual learning strategies with custom behavior, without having to rewrite the training loop from scratch. Avalanche strategies accept an optional list of plugins that will be executed during the training/evaluation loops.
For example, early stopping is implemented as a plugin:
In Avalanche, most continual learning strategies are implemented using plugins, which makes it easy to combine them together. For example, it is extremely easy to create a hybrid strategy that combines replay and EWC together by passing the appropriate plugins list to the SupervisedTemplate:
Beware that most strategy plugins modify the internal state. As a result, not all the strategy plugins can be combined together. For example, it does not make sense to use multiple replay plugins since they will try to modify the same strategy variables (mini-batches, dataloaders), and therefore they will be in conflict.
📝 A Look Inside Avalanche Strategies
If you arrived at this point you already know how to use Avalanche strategies and are ready to use it. However, before making your own strategies you need to understand a little bit the internal implementation of the training and evaluation loops.
In Avalanche you can customize a strategy in 2 ways:
Plugins: Most strategies can be implemented as additional code that runs on top of the basic training and evaluation loops (e.g. the Naive strategy). Therefore, the easiest way to define a custom strategy such as a regularization or replay strategy, is to define it as a custom plugin. The advantage of plugins is that they can be combined, as long as they are compatible, i.e. they do not modify the same part of the state. The disadvantage is that in order to do so you need to understand the strategy loop, which can be a bit complex at first.
Subclassing: In Avalanche, continual learning strategies inherit from the appropriate template, which provides generic training and evaluation loops. The most high level template is the BaseTemplate, from which all the Avalanche's strategies inherit. Most template's methods can be safely overridden (with some caveats that we will see later).
Keep in mind that if you already have a working continual learning strategy that does not use Avalanche, you can use most Avalanche components such as benchmarks, evaluation, and models without using Avalanche's strategies!
Training and Evaluation Loops
As we already mentioned, Avalanche strategies inherit from the appropriate template (e.g. continual supervised learning strategies inherit from the SupervisedTemplate). These templates provide:
Basic Training and Evaluation loops which define a naive (finetuning) strategy.
Callback points, which are used to call the plugins at a specific moments during the loop's execution.
A set of variables representing the state of the loops (current model, data, mini-batch, predictions, ...) which allows plugins and child classes to easily manipulate the state of the training loop.
The training loop has the following structure:
The evaluation loop is similar:
Methods starting with before/after are the methods responsible for calling the plugins. Notice that before the start of each experience during training we have several phases:
dataset adaptation: This is the phase where the training data can be modified by the strategy, for example by adding other samples from a separate buffer.
dataloader initialization: Initialize the data loader. Many strategies (e.g. replay) use custom dataloaders to balance the data.
model adaptation: Here, the dynamic models (see the models tutorial) are updated by calling their adaptation method.
optimizer initialization: After the model has been updated, the optimizer should also be updated to ensure that the new parameters are optimized.
Strategy State
The strategy state is accessible via several attributes. Most of these can be modified by plugins and subclasses:
self.clock: keeps track of several event counters.
self.experience: the current experience.
self.adapted_dataset: the data modified by the dataset adaptation phase.
self.dataloader: the current dataloader.
self.mbatch: the current mini-batch. For supervised classification problems, mini-batches have the form <x, y, t>, where x is the input, y is the target class, and t is the task label.
self.mb_output: the current model's output.
self.loss: the current loss.
self.is_training: True if the strategy is in training mode.
How to Write a Plugin
Plugins provide a simple solution to define a new strategy by augmenting the behavior of another strategy (typically the Naive strategy). This approach reduces the overhead and code duplication, improving code readability and prototyping speed.
Creating a plugin is straightforward. As with strategies, you have to create a class which inherits from the corresponding plugin template (BasePlugin, BaseSGDPlugin, SupervisedPlugin) and implements the callbacks that you need. The exact callback to use depend on the aim of your plugin. You can use the loop shown above to understand what callbacks you need to use. For example, we show below a simple replay plugin that uses after_training_exp to update the buffer after each training experience, and the before_training_exp to customize the dataloader. Notice that before_training_exp is executed after make_train_dataloader, which means that the Naive strategy already updated the dataloader. If we used another callback, such as before_train_dataset_adaptation, our dataloader would have been overwritten by the Naive strategy. Plugin methods always receive the strategy as an argument, so they can access and modify the strategy's state.
Check base plugin's documentation for a complete list of the available callbacks.
How to Write a Custom Strategy
You can always define a custom strategy by overriding the corresponding template methods. However, There is an important caveat to keep in mind. If you override a method, you must remember to call all the callback's handlers (the methods starting with before/after) at the appropriate points. For example, train calls before_training and after_training before and after the training loops, respectively. The easiest way to avoid mistakes is to start from the template's method that you want to override and modify it to your own needs without removing the callbacks handling.
Notice that the EvaluationPlugin (see evaluation tutorial) uses the strategy callbacks.
As an example, the SupervisedTemplate, for continual supervised strategies, provides the global state of the loop in the strategy's attributes, which you can safely use when you override a method. For instance, the Cumulative strategy trains a model continually on the union of all the experiences encountered so far. To achieve this, the cumulative strategy overrides adapt_train_dataset and updates `self.adapted_dataset' by concatenating all the previous experiences with the current one.
Easy, isn't it? :-)
In general, we recommend to implement a Strategy via plugins, if possible. This approach is the easiest to use and requires a minimal knowledge of the strategy templates. It also allows other people to re-use your plugin and facilitates interoperability among different strategies.
For example, replay strategies can be implemented as a custom strategy or as plugins. However, creating a plugin allows to use the replay in conjunction with other strategies or plugins, making possible the combination of different approach to build the ultimate continual learning algorithm!.
This completes the "Training" chapter for the "From Zero to Hero" series. We hope you enjoyed it!
🤝 Run it on Google Colab
You can run this chapter and play with it on Google Colaboratory:
Learn Avalanche in 5 Minutes
A Short Guide for Researchers on the Run
Avalanche is mostly about making the life of a continual learning researcher easier.
Below, you can see the main Avalanche modules and how they interact with each other.
avalanche
What are the three pillars of any respectful continual learning research project?
Benchmarks: Machine learning researchers need multiple benchmarks with efficient data handling utils to design and prototype new algorithms. Quantitative results on ever-changing benchmarks has been one of the driving forces of Deep Learning.
Training: Efficient implementation and training of continual learning algorithms; comparisons with other baselines and state-of-the-art methods become fundamental to asses the quality of an original algorithmic proposal.
With Avalanche, you can find all these three fundamental pieces together and much more, in a single and coherent, well-maintained codebase.
Let's take a quick tour on how you can use Avalanche for your research projects with a 5-minutes guide, for researchers on the run!
Let's first install Avalanche. Please, check out our guide for further details.
🏛️ General Architecture
Avalanche is organized in five main modules:
Benchmarks: This module maintains a uniform API for data handling: mostly generating a stream of data from one or more datasets. It contains all the major CL benchmarks (similar to what has been done for ).
Training: This module provides all the necessary utilities concerning model training. This includes simple and efficient ways of implement new continual learning strategies as well as a set pre-implemented CL baselines and state-of-the-art algorithms you will be able to use for comparison!
Evaluation: This modules provides all the utilities and metrics that can help in evaluating a CL algorithm with respect to all the factors we believe to be important for a continually learning system.
In the graphic below, you can see how Avalanche sub-modules are available and organized as well:
We will learn more about each of them during this tutorial series, but keep in mind that the [Avalanche API documentation](https://avalanche-api.continualai.org/en/latest/) is your friend as well!
All right, let's start with the benchmarks module right away 👇
📚 Benchmarks
The benchmark module offers three main features:
Datasets: a comprehensive list of PyTorch Datasets ready to use (It includes all the Torchvision Datasets and more!).
Classic Benchmarks: a set of classic Continual Learning Benchmarks ready to be used (there can be multiple benchmarks based on a single dataset).
Generators: a set of functions you can use to generate your own benchmark starting from any PyTorch Dataset!
Datasets
Datasets can be imported in Avalanche as simply as:
Of course, you can use them as you would use any PyTorch Dataset.
Benchmarks Basics
The Avalanche benchmarks (instances of the Scenario class), contains several attributes that describe the benchmark. However, the most important ones are the train and test streams.
In Avalanche we often suppose to have access to these two parallel stream of data (even though some benchmarks may not provide such feature, but contain just a unique test set).
Each of these streams are iterable, indexable and sliceable objects that are composed of experiences. Experiences are batch of data (or "tasks") that can be provided with or without a specific task label.
Classic Benchmarks
Avalanche maintains a set of commonly used benchmarks built on top of one or multiple datasets.
Benchmarks Generators
What if we want to create a new benchmark that is not present in the "Classic" ones? Well, in that case Avalanche offers a number of utilities that you can use to create your own benchmark with maximum flexibility: the benchmark generators!
The specific scenario generators are useful when starting from one or multiple PyTorch datasets and you want to create a "New Instances" or "New Classes" benchmark: i.e. it supports the easy and flexible creation of a Domain-Incremental, Class-Incremental or Task-Incremental scenarios among others.
Finally, if your ideal benchmark does not fit well in the aforementioned Domain-Incremental, Class-Incremental or Task-Incremental scenarios, you can always use our generic generators:
filelist_benchmark
paths_benchmark
dataset_benchmark
You can read more about how to use them the full Benchmarks module tutorial!
💪 Training
The training module in Avalanche is build on modularity and it has two main goals:
provide a set of standard continual learning baselines that can be easily run for comparison;
provide the necessary utilities to implement and run your own strategy in the most efficient and simple way possible thanks to the building blocks we already prepared for you.
Strategies
If you want to compare your strategy with other classic continual learning algorithms or baselines, in Avalanche this is as simple as creating an object:
Create your own Strategy
The simplest way to build your own strategy is to create a python class that implements the main train and eval methods.
Let's define our Continual Learning algorithm "MyStrategy" as a simple python class:
Then, we can use our strategy as we would do for the pre-implemented ones:
While this is the easiest possible way to add your own strategy, Avalanche supports more sophisticated modalities (based on callbacks) that lets you write more neat, modular and reusable code**, inheriting functionality from a parent classes and using pre-implemented plugins.
Check out more details about what Avalanche can offer in this module following the "Training" chapter of the "From Zero to Hero" tutorial!
📈 Evaluation
The evaluation module is quite straightforward: it offers all the basic functionalities to evaluate and keep track of a continual learning experiment.
This is mostly done through the Metrics and the Loggers. The Metrics provide a set of classes which implements the main continual learning metrics like Accuracy, Forgetting, Memory Usage, Running Times, etc.
Metrics should be created via the utility functions (e.g. accuracy_metrics, timing_metrics and others) specifying in the arguments when those metrics should be computed (after each minibatch, epoch, experience etc...).
The Loggers specify a way to report the metrics (e.g. with Tensorboard, on console or others). Loggers are created by instantiating the respective class.
Metrics and loggers interact via the Evaluation Plugin: this is the main object responsible of tracking the experiment progress. Metrics and loggers are directly passed to the EvaluationPlugin instance. You will see the output of the loggers automatically during training and evaluation! Let's see how to put this together in few lines of code:
For more details about the evaluation module (how to write new metrics/loggers, a deeper tutorial on metrics) check out the extended guide in the "Evaluation" chapter of the "From Zero to Hero"Avalanche tutorial!
🔗 Putting all Together
You've learned how to install Avalanche, how to create benchmarks that can suit your needs, how you can create your own continual learning algorithm and how you can evaluate its performance.
Here we show how you can use all these modules together to design your experiments as quantitative supporting evidence for your research project or paper.
🤝 Run it on Google Colab
You can run this chapter and play with it on Google Colaboratory:
Advanced Transformations
Dealing with transformations (groups, appending, replacing, freezing).
AvalancheDataset (and its subclasses like the AvalancheTensor/Subset/ConcatDataset) allow for a finer control over transformations. While torchvision (and other) datasets allow for a minimal mechanism to apply transformations, with AvalancheDataset one can:
Have multiple transformation "groups" in the same dataset (like separated train and test transformations).
Append, replace and remove transformations, even by using nested Subset/Concat Datasets.
Freeze transformations, so that they can't be changed.
The following sub-sections show examples on how to use these features. Please note that all the constructor parameters and the methods described in this How-To can be used on AvalancheDataset subclasses as well. For more info on all the available subclasses, refer to .
It is warmly recommended to run this page as a notebook using Colab (info at the bottom of this page).
Let's start by installing Avalanche:
Transformation groups
AvalancheDatasets can contain multiple transformation groups. This can be useful to keep train and test transformations in the same dataset and to have different set of transformations. This may come in handy in many situations (for instance, to apply ad-hoc transformations to replay data).
As in torchvision datasets, AvalancheDataset supports the two kind of transformations: the transform, which is applied to X values, and the target_transform, which is applied to Y values. The latter is rarely used. This means that a transformation group is a pair of transformations to be applied to the X and Y values of each instance returned by the dataset. In both torchvision and Avalanche implementations, a transformation must be a function (or other callable object) that accepts one input (the X or Y value) and outputs its transformed version. This pair of functions is stored in the transform and target_transform fields of the dataset. A comprehensive guide on transformations can be found in the .
In the following example, a MNIST dataset is created and then wrapped in an AvalancheDataset. When creating the AvalancheDataset, we can set train and eval transformations by passing a transform_groups parameter. Train transformations usually include some form of random augmentation, while eval transformations usually include a sequence of deterministic transformations only. Here we define the sequence of train transformations as a random rotation followed by the ToTensor operation. The eval transformations only include the ToTensor operation.
Of course, one can also just use the transform and target_transform constructor parameters to set the transformations for both the train and the eval groups. However, it is recommended to use the approach based on transform_groups (shown in the code above) as it is much more flexible.
Using .train() and .eval()
The default behaviour of the AvalancheDataset is to use transformations from the train group. However, one can easily obtain a version of the dataset where the eval group is used. Note: when obtaining the dataset of experiences from the test stream, those datasets will already be using the eval group of transformations so you don't need to switch to the eval group ;).
As noted before, transformations for the current group are loaded in the transform and target_transform fields. These fields can be changed directly, but this is NOT recommended, as this will not create a copy of the dataset and may probably affect other parts of the code in which the dataset is used.
The recommended way to switch between the train and eval groups is to use the .train() and .eval() methods to obtain a copy (view) of the dataset with the proper transformations enabled. This is another very handy feature of the AvalancheDataset: methods that manipulate the AvalancheDataset fields (and transformations) always create a view of the dataset. The original dataset is never changed.
In the following cell we use the avl_mnist_transform dataset created in the cells above. We first obtain a view of it in which eval transformations are enabled. Then, starting from this view, we obtain a version of it in which train transformations are enabled. We want to double-stress that .train() and .eval() never change the group of the dataset on which they are called: they always create a view.
One can check that the correct transformation group is in use by looking at the content of the transform/target_transform fields.
Custom transformation groups
In AvalancheDatasets the train and eval transformation groups are always available. However, AvalancheDataset also supports custom transformation groups.
The following example shows how to create an AvalancheDataset with an additional group named replay. We define the replay transformation as a random crop followed by the ToTensor operation.
However, once created the dataset will use the train group. There are two ways to switch to our custom group:
Set the group when creating the dataset using the initial_transform_group constructor parameter
Switch to the group using the .with_transforms(group_name) method
The .with_transforms(group_name) method behaves in the same way .train() and .eval() do by creating a view of the original dataset.
The following example shows how to use both methods:
Appending transformations
In the standard torchvision datasets the only way to append (that is, add a new transformation step to the list of existing one) is to change the transform field directly by doing something like this:
This solution has many huge drawbacks:
The transformation field of the dataset is changed directly. This will affect other parts of the code that use that dataset instance.
If the initial transform is None, then Compose will not complain, but the process will crash later (try it by yourself: replace the first element of Compose in cell above with None, then try obtaining a data point from the dataset).
AvalancheDataset offers a very simple method to append transformations without incurring in those issues. The .add_transforms(transform=None, target_transform=None) method will append the given transform(s) to the currently enabled transform group and will return a new (a view actually) dataset with given transformations appended to the existing ones. The original dataset is not affected. One can also use .add_transforms_to_group(group_name, transform, target_transform) to change transformations for a different group.
The next cell shows how to use .add_transforms(...) to append the to_append_transform transform defined in the cell above.
Note that by using .add_transforms(...):
The original dataset is not changed, which means that other parts of the code that use that dataset instance are not affected.
You don't need to worry about None transformations.
In order to revert to the original transformations you don't need to keep a copy of them: the original dataset is not affected!
Replacing transformations
The replacement operation follows the same idea (and benefits) of the append one. By using .replace_transforms(transform, target_transform) one can obtain a view of the original dataset in which the transformaations for the current group are replaced with the given ones. One may also change tranformations for other groups by passing the name of the group as the optional parameter group. As with any transform-related operation, the original dataset is not affected.
Note: one can use .replace_transforms(...) to remove previous transformations (by passing None as the new transform).
The following cell shows how to use .replace_transforms(...) to replace the transformations of the current group:
Freezing transformations
One last functionality regarding transformations is the ability to "freeze" transformations. Freezing transformations menas permanently glueing transformations to the dataset so that they can't be replaced or changed in any way (usually by mistake). Frozen transformations cannot be changed by using .replace_transforms(...) or even by changing the transform field directly.
One may wonder when this may come in handy... in fact, you will probably rarely need to freeze transformations. However, imagine having to instantiate the PermutedMNIST benchmark. You want the permutation transformation to not be changed by mistake. However, the end users do not know how the internal implementations of the benchmark works, so they may end up messing with those transformations. By freezing the permutation transformation, users cannot mess with it.
Transformations for all transform groups can be frozen at once by using .freeze_transforms(). Transformations can be frozen for a single group by using .freeze_group_transforms(group_name). As always, those methods return a view of the original dataset.
The cell below shows a simplified excerpt from the . First, a PixelsPermutation instance is created. That instance is a transformation that will permute the pixels of the input image. We then create the train end test sets. Once created, transformations for those datasets are frozen using .freeze_transforms().
In this way, that transform can't be removed. However, remember that one can always append other transforms atop of frozen transforms.
The cell below shows that replace_transforms can't remove frozen transformations:
Transformations wrap-up
This completes the Mini How-To for the functionalities of the AvalancheDataset related to transformations.
Here you learned how to use transformation groups and how to append/replace/freeze transformations in a simple way.
Other Mini How-Tos will guide you through the other functionalities offered by the AvalancheDataset class. The list of Mini How-Tos can be found .
🤝 Run it on Google Colab
You can run this chapter and play with it on Google Colaboratory by clicking here:
!pip install avalanche-lib=0.2.1
from torch.optim import SGD
from torch.nn import CrossEntropyLoss
from avalanche.models import SimpleMLP
from avalanche.training.supervised import Naive, CWRStar, Replay, GDumb, Cumulative, LwF, GEM, AGEM, EWC  # and many more!

model = SimpleMLP(num_classes=10)
optimizer = SGD(model.parameters(), lr=0.001, momentum=0.9)
criterion = CrossEntropyLoss()
cl_strategy = Naive(
    model, optimizer, criterion,
    train_mb_size=100, train_epochs=4, eval_mb_size=100
)
from avalanche.benchmarks.classic import SplitMNIST

# scenario
benchmark = SplitMNIST(n_experiences=5, seed=1)

# TRAINING LOOP
print('Starting experiment...')
results = []
for experience in benchmark.train_stream:
    print("Start of experience: ", experience.current_experience)
    print("Current Classes: ", experience.classes_in_this_experience)

    cl_strategy.train(experience)
    print('Training completed')

    print('Computing accuracy on the whole test set')
    results.append(cl_strategy.eval(benchmark.test_stream))
train
    before_training

    before_train_dataset_adaptation
    train_dataset_adaptation
    after_train_dataset_adaptation
    make_train_dataloader
    model_adaptation
    make_optimizer
    before_training_exp  # for each exp
        before_training_epoch  # for each epoch
            before_training_iteration  # for each iteration
                before_forward
                after_forward
                before_backward
                after_backward
            after_training_iteration
            before_update
            after_update
        after_training_epoch
    after_training_exp
    after_training
eval
    before_eval
    before_eval_dataset_adaptation
    eval_dataset_adaptation
    after_eval_dataset_adaptation
    make_eval_dataloader
    model_adaptation
    before_eval_exp  # for each exp
        eval_epoch  # we have a single epoch in evaluation mode
            before_eval_iteration  # for each iteration
                before_eval_forward
                after_eval_forward
            after_eval_iteration
    after_eval_exp
    after_eval
from avalanche.benchmarks.utils.data_loader import ReplayDataLoader
from avalanche.core import SupervisedPlugin
from avalanche.training.storage_policy import ReservoirSamplingBuffer


class ReplayP(SupervisedPlugin):

    def __init__(self, mem_size):
        """ A simple replay plugin with reservoir sampling. """
        super().__init__()
        self.buffer = ReservoirSamplingBuffer(max_size=mem_size)

    def before_training_exp(self, strategy: "SupervisedTemplate",
                            num_workers: int = 0, shuffle: bool = True,
                            **kwargs):
        """ Use a custom dataloader to combine samples from the current data and memory buffer. """
        if len(self.buffer.buffer) == 0:
            # first experience. We don't use the buffer, no need to change
            # the dataloader.
            return
        strategy.dataloader = ReplayDataLoader(
            strategy.adapted_dataset,
            self.buffer.buffer,
            oversample_small_tasks=True,
            num_workers=num_workers,
            batch_size=strategy.train_mb_size,
            shuffle=shuffle)

    def after_training_exp(self, strategy: "SupervisedTemplate", **kwargs):
        """ Update the buffer. """
        self.buffer.update(strategy, **kwargs)


benchmark = SplitMNIST(n_experiences=5, seed=1)
model = SimpleMLP(num_classes=10)
optimizer = SGD(model.parameters(), lr=0.01, momentum=0.9)
criterion = CrossEntropyLoss()
strategy = Naive(model=model, optimizer=optimizer, criterion=criterion, train_mb_size=128,
                 plugins=[ReplayP(mem_size=2000)])
strategy.train(benchmark.train_stream)
strategy.eval(benchmark.test_stream)
import torch
from avalanche.evaluation.metrics import Accuracy

task_labels = 0  # we will work with a single task
# create an instance of the standalone Accuracy metric
# initial accuracy is 0 for each task
acc_metric = Accuracy()
print("Initial Accuracy: ", acc_metric.result()) #  output {}

# two consecutive metric updates
real_y = torch.tensor([1, 2]).long()
predicted_y = torch.tensor([1, 0]).float()
acc_metric.update(real_y, predicted_y, task_labels)
acc = acc_metric.result()
print("Average Accuracy: ", acc) # output 0.5 on task 0
predicted_y = torch.tensor([1,2]).float()
acc_metric.update(real_y, predicted_y, task_labels)
acc = acc_metric.result()
print("Average Accuracy: ", acc) # output 0.75 on task 0

# reset accuracy
acc_metric.reset()
print("After reset: ", acc_metric.result()) # output {}
from avalanche.evaluation.metrics import accuracy_metrics, \
    loss_metrics, forgetting_metrics, bwt_metrics,\
    confusion_matrix_metrics, cpu_usage_metrics, \
    disk_usage_metrics, gpu_usage_metrics, MAC_metrics, \
    ram_usage_metrics, timing_metrics

# you may pass the result to the EvaluationPlugin
metrics = accuracy_metrics(epoch=True, experience=True)
from torch.nn import CrossEntropyLoss
from torch.optim import SGD
from avalanche.benchmarks.classic import SplitMNIST
from avalanche.evaluation.metrics import forgetting_metrics, \
accuracy_metrics, loss_metrics, timing_metrics, cpu_usage_metrics, \
confusion_matrix_metrics, disk_usage_metrics
from avalanche.models import SimpleMLP
from avalanche.logging import InteractiveLogger
from avalanche.training.plugins import EvaluationPlugin
from avalanche.training import Naive

benchmark = SplitMNIST(n_experiences=5)

# MODEL CREATION
model = SimpleMLP(num_classes=benchmark.n_classes)

# DEFINE THE EVALUATION PLUGIN
# The evaluation plugin manages the metrics computation.
# It takes as argument a list of metrics, collectes their results and returns
# them to the strategy it is attached to.

eval_plugin = EvaluationPlugin(
    accuracy_metrics(minibatch=True, epoch=True, experience=True, stream=True),
    loss_metrics(minibatch=True, epoch=True, experience=True, stream=True),
    timing_metrics(epoch=True),
    forgetting_metrics(experience=True, stream=True),
    cpu_usage_metrics(experience=True),
    confusion_matrix_metrics(num_classes=benchmark.n_classes, save_image=False, stream=True),
    disk_usage_metrics(minibatch=True, epoch=True, experience=True, stream=True),
    loggers=[InteractiveLogger()],
    benchmark=benchmark,
    strict_checks=False
)

# CREATE THE STRATEGY INSTANCE (NAIVE)
cl_strategy = Naive(
    model, SGD(model.parameters(), lr=0.001, momentum=0.9),
    CrossEntropyLoss(), train_mb_size=500, train_epochs=1, eval_mb_size=100,
    evaluator=eval_plugin)

# TRAINING LOOP
print('Starting experiment...')
results = []
for experience in benchmark.train_stream:
    # train returns a dictionary which contains all the metric values
    res = cl_strategy.train(experience)
    print('Training completed')

    print('Computing accuracy on the whole test set')
    # test also returns a dictionary which contains all the metric values
    results.append(cl_strategy.eval(benchmark.test_stream))
from avalanche.evaluation import Metric


# a standalone metric implementation
class MyStandaloneMetric(Metric[float]):
    """
    This metric will return a `float` value
    """
    def __init__(self):
        """
        Initialize your metric here
        """
        super().__init__()
        pass

    def update(self):
        """
        Update metric value here
        """
        pass

    def result(self) -> float:
        """
        Emit the metric result here
        """
        return 0

    def reset(self):
        """
        Reset your metric here
        """
        pass
from avalanche.evaluation import PluginMetric
from avalanche.evaluation.metrics import Accuracy
from avalanche.evaluation.metric_results import MetricValue
from avalanche.evaluation.metric_utils import get_metric_name


class MyPluginMetric(PluginMetric[float]):
    """
    This metric will return a `float` value after
    each training epoch
    """

    def __init__(self):
        """
        Initialize the metric
        """
        super().__init__()

        self._accuracy_metric = Accuracy()

    def reset(self) -> None:
        """
        Reset the metric
        """
        self._accuracy_metric.reset()

    def result(self) -> float:
        """
        Emit the result
        """
        return self._accuracy_metric.result()

    def after_training_iteration(self, strategy: 'PluggableStrategy') -> None:
        """
        Update the accuracy metric with the current
        predictions and targets
        """
        # task labels defined for each experience
        task_labels = strategy.experience.task_labels
        if len(task_labels) > 1:
            # task labels defined for each pattern
            task_labels = strategy.mb_task_id
        else:
            task_labels = task_labels[0]

        self._accuracy_metric.update(strategy.mb_output, strategy.mb_y,
                                     task_labels)

    def before_training_epoch(self, strategy: 'PluggableStrategy') -> None:
        """
        Reset the accuracy before the epoch begins
        """
        self.reset()

    def after_training_epoch(self, strategy: 'PluggableStrategy'):
        """
        Emit the result
        """
        return self._package_result(strategy)


    def _package_result(self, strategy):
        """Taken from `GenericPluginMetric`, check that class out!"""
        metric_value = self.accuracy_metric.result()
        add_exp = False
        plot_x_position = strategy.clock.train_iterations

        if isinstance(metric_value, dict):
            metrics = []
            for k, v in metric_value.items():
                metric_name = get_metric_name(
                    self, strategy, add_experience=add_exp, add_task=k)
                metrics.append(MetricValue(self, metric_name, v,
                                           plot_x_position))
            return metrics
        else:
            metric_name = get_metric_name(self, strategy,
                                          add_experience=add_exp,
                                          add_task=True)
            return [MetricValue(self, metric_name, metric_value,
                                plot_x_position)]

    def __str__(self):
        """
        Here you can specify the name of your metric
        """
        return "Top1_Acc_Epoch"
eval_plugin2 = EvaluationPlugin(
    accuracy_metrics(minibatch=True, epoch=True, experience=True, stream=True),
    loss_metrics(minibatch=True, epoch=True, experience=True, stream=True),
    forgetting_metrics(experience=True, stream=True),
    timing_metrics(epoch=True),
    cpu_usage_metrics(experience=True),
    confusion_matrix_metrics(num_classes=benchmark.n_classes, save_image=False, stream=True),
    disk_usage_metrics(minibatch=True, epoch=True, experience=True, stream=True),
    collect_all=True, # this is default value anyway
    loggers=[InteractiveLogger()],
    benchmark=benchmark
)

# since no training and evaluation has been performed, this will return an empty dict.
metric_dict = eval_plugin2.get_all_metrics()
print(metric_dict)
d = eval_plugin.get_all_metrics()
d['Top1_Acc_Epoch/train_phase/train_stream/Task000']
print(res)
print(results[-1])
Evaluation: Training utils and Benchmarks are not enough alone to push continual learning research forward. Comprehensive and sound evaluation protocols and metrics need to be employed as well.
Models: In this module you'll be able to find several model architectures and pre-trained models that can be used for your continual learning experiment (similar to what has been done in torchvision.models).
Logging: It includes advanced logging and plotting features, including native stdout, file and Tensorboard support (How cool it is to have a complete, interactive dashboard, tracking your experiment metrics in real-time with a single line of code?)
If you need to change transformations only temporarly to do some specific things in a limited part of the code, then you need to store the previous set of transformations in some variable in order to switch back to them later.
from avalanche.benchmarks.classic import CORe50, SplitTinyImageNet, SplitCIFAR10, \
    SplitCIFAR100, SplitCIFAR110, SplitMNIST, RotatedMNIST, PermutedMNIST, SplitCUB200

# creating the benchmark (scenario object)
perm_mnist = PermutedMNIST(
    n_experiences=3,
    seed=1234,
)

# recovering the train and test streams
train_stream = perm_mnist.train_stream
test_stream = perm_mnist.test_stream

# iterating over the train stream
for experience in train_stream:
    print("Start of task ", experience.task_label)
    print('Classes in this task:', experience.classes_in_this_experience)

    # The current Pytorch training set can be easily recovered through the
    # experience
    current_training_set = experience.dataset
    # ...as well as the task_label
    print('Task {}'.format(experience.task_label))
    print('This task contains', len(current_training_set), 'training examples')

    # we can recover the corresponding test experience in the test stream
    current_test_set = test_stream[experience.current_experience].dataset
    print('This task contains', len(current_test_set), 'test examples')
from avalanche.benchmarks.generators import filelist_benchmark, dataset_benchmark, \
                                            tensors_benchmark, paths_benchmark
from avalanche.models import SimpleMLP
from avalanche.training import Naive, CWRStar, Replay, GDumb, \
    Cumulative, LwF, GEM, AGEM, EWC, AR1
from torch.optim import SGD
from torch.nn import CrossEntropyLoss

model = SimpleMLP(num_classes=10)
cl_strategy = Naive(
    model, SGD(model.parameters(), lr=0.001, momentum=0.9),
    CrossEntropyLoss(), train_mb_size=100, train_epochs=4, eval_mb_size=100
)
from torch.utils.data import DataLoader

class MyStrategy():
    """My Basic Strategy"""

    def __init__(self, model, optimizer, criterion):
        self.model = model
        self.optimizer = optimizer
        self.criterion = criterion

    def train(self, experience):
        # here you can implement your own training loop for each experience (i.e.
        # batch or task).

        train_dataset = experience.dataset
        t = experience.task_label
        train_data_loader = DataLoader(
            train_dataset, num_workers=4, batch_size=128
        )

        for epoch in range(1):
            for mb in train_data_loader:
                # you magin here...
                pass

    def eval(self, experience):
        # here you can implement your own eval loop for each experience (i.e.
        # batch or task).

        eval_dataset = experience.dataset
        t = experience.task_label
        eval_data_loader = DataLoader(
            eval_dataset, num_workers=4, batch_size=128
        )

        # eval here
from avalanche.models import SimpleMLP
from avalanche.benchmarks import SplitMNIST

# Benchmark creation
benchmark = SplitMNIST(n_experiences=5)

# Model Creation
model = SimpleMLP(num_classes=benchmark.n_classes)

# Create the Strategy Instance (MyStrategy)
cl_strategy = MyStrategy(
    model, SGD(model.parameters(), lr=0.001, momentum=0.9),
    CrossEntropyLoss())

# Training Loop
print('Starting experiment...')

for exp_id, experience in enumerate(benchmark.train_stream):
    print("Start of experience ", experience.current_experience)

    cl_strategy.train(experience)
    print('Training completed')

    print('Computing accuracy on the current test set')
    cl_strategy.eval(benchmark.test_stream[exp_id])
# utility functions to create plugin metrics
from avalanche.evaluation.metrics import accuracy_metrics, loss_metrics, forgetting_metrics
from avalanche.logging import InteractiveLogger, TensorboardLogger
from avalanche.training.plugins import EvaluationPlugin

eval_plugin = EvaluationPlugin(
    # accuracy after each training epoch
    # and after each evaluation experience
    accuracy_metrics(epoch=True, experience=True),
    # loss after each training minibatch and each
    # evaluation stream
    loss_metrics(minibatch=True, stream=True),
    # catastrophic forgetting after each evaluation
    # experience
    forgetting_metrics(experience=True, stream=True),
    # add as many metrics as you like
    loggers=[InteractiveLogger(), TensorboardLogger()])

# pass the evaluation plugin instance to the strategy
# strategy = EWC(..., evaluator=eval_plugin)

# THAT'S IT!!
from avalanche.benchmarks.classic import SplitMNIST
from avalanche.evaluation.metrics import forgetting_metrics, accuracy_metrics,\
    loss_metrics, timing_metrics, cpu_usage_metrics, StreamConfusionMatrix,\
    disk_usage_metrics, gpu_usage_metrics
from avalanche.models import SimpleMLP
from avalanche.logging import InteractiveLogger, TextLogger, TensorboardLogger
from avalanche.training.plugins import EvaluationPlugin
from avalanche.training import Naive

from torch.optim import SGD
from torch.nn import CrossEntropyLoss

benchmark = SplitMNIST(n_experiences=5)

# MODEL CREATION
model = SimpleMLP(num_classes=benchmark.n_classes)

# DEFINE THE EVALUATION PLUGIN and LOGGERS
# The evaluation plugin manages the metrics computation.
# It takes as argument a list of metrics, collectes their results and returns
# them to the strategy it is attached to.

# log to Tensorboard
tb_logger = TensorboardLogger()

# log to text file
text_logger = TextLogger(open('log.txt', 'a'))

# print to stdout
interactive_logger = InteractiveLogger()

eval_plugin = EvaluationPlugin(
    accuracy_metrics(minibatch=True, epoch=True, experience=True, stream=True),
    loss_metrics(minibatch=True, epoch=True, experience=True, stream=True),
    timing_metrics(epoch=True),
    cpu_usage_metrics(experience=True),
    forgetting_metrics(experience=True, stream=True),
    StreamConfusionMatrix(num_classes=benchmark.n_classes, save_image=False),
    disk_usage_metrics(minibatch=True, epoch=True, experience=True, stream=True),
    loggers=[interactive_logger, text_logger, tb_logger],
    benchmark=benchmark
)

# CREATE THE STRATEGY INSTANCE (NAIVE)
cl_strategy = Naive(
    model, SGD(model.parameters(), lr=0.001, momentum=0.9),
    CrossEntropyLoss(), train_mb_size=500, train_epochs=1, eval_mb_size=100,
    evaluator=eval_plugin)

# TRAINING LOOP
print('Starting experiment...')
results = []
for experience in benchmark.train_stream:
    print("Start of experience: ", experience.current_experience)
    print("Current Classes: ", experience.classes_in_this_experience)

    # train returns a dictionary which contains all the metric values
    res = cl_strategy.train(experience, num_workers=4)
    print('Training completed')

    print('Computing accuracy on the whole test set')
    # eval also returns a dictionary which contains all the metric values
    results.append(cl_strategy.eval(benchmark.test_stream, num_workers=4))
!pip install avalanche-lib
from torchvision import transforms
from torchvision.datasets import MNIST
from avalanche.benchmarks.utils import AvalancheDataset

mnist_dataset = MNIST('mnist_data', download=True)

# Define the training transformation for X values
train_transformation = transforms.Compose([
    transforms.RandomRotation(45),
    transforms.ToTensor(),
])
# Define the training transformation for Y values (rarely used)
train_target_transformation = None

# Define the test transformation for X values
eval_transformation = transforms.ToTensor()
# Define the test transformation for Y values (rarely used)
eval_target_transformation = None

transform_groups = {
    'train': (train_transformation, train_target_transformation),
    'eval': (eval_transformation, eval_target_transformation)
}

avl_mnist_transform = AvalancheDataset(mnist_dataset, transform_groups=transform_groups)
# Not recommended: use transform_groups instead
avl_mnist_same_transforms =  AvalancheDataset(mnist_dataset, transform=train_transformation)
# Obtain a view of the dataset in which eval transformations are enabled
avl_mnist_eval = avl_mnist_transform.eval()

# Obtain a view of the dataset in which we get back to train transforms
# Basically, avl_mnist_transform ~= avl_mnist_train
avl_mnist_train = avl_mnist_eval.train()

# Check the current transformations function for the 3 datasets
print('Original dataset transformation:', avl_mnist_transform.transform)
# Output:
# Original dataset transformation: Compose(
#     RandomRotation(degrees=[-45.0, 45.0], interpolation=nearest, expand=False, fill=0)
#     ToTensor()
# )
print('--------------------------------')
print('Eval version of the dataset:', avl_mnist_eval.transform)
# Output: "Eval version of the dataset: ToTensor()"
print('--------------------------------')
print('Back to train transformations:', avl_mnist_train.transform)
# Output:
# Back to train transformations: Compose(
#     RandomRotation(degrees=[-45.0, 45.0], interpolation=nearest, expand=False, fill=0)
#     ToTensor()
# )
# Method 1: create the dataset with "replay" as the default group
avl_mnist_custom_transform_1 = AvalancheDataset(
    mnist_dataset,
    transform_groups=transform_groups_with_replay,
    initial_transform_group='replay')

print(avl_mnist_custom_transform_1.transform)

# Method 2: switch to "replay" using `.with_transforms(group_name)`
avl_mnist_custom_transform_not_enabled = AvalancheDataset(
    mnist_dataset,
    transform_groups=transform_groups_with_replay)

avl_mnist_custom_transform_2 = avl_mnist_custom_transform_not_enabled.with_transforms('replay')
print(avl_mnist_custom_transform_2.transform)

# Both prints output:
# Compose(
#     RandomCrop(size=(28, 28), padding=4)
#     ToTensor()
# )
# Append a transform by using torchvision datasets (>>> DON'T DO THIS! <<<)

# Create the dataset
mnist_dataset_w_totensor = MNIST('mnist_data', download=True, transform=transforms.ToTensor())

# Append a transform
to_append_transform = transforms.RandomCrop(size=(28, 28), padding=4)
mnist_dataset_w_totensor.transform = transforms.Compose(
    [mnist_dataset_w_totensor.transform, to_append_transform]
)
print(mnist_dataset_w_totensor.transform)
# Prints:
# Compose(
#     ToTensor()
#     RandomCrop(size=(28, 28), padding=4)
# )
# Create the dataset
avl_mnist = AvalancheDataset(MNIST('mnist_data', download=True), transform=transforms.ToTensor())

# Append a transformation. Simple as:
avl_mnist_appended_transform = avl_mnist.add_transforms(to_append_transform)

print('With appended transforms:', avl_mnist_appended_transform.transform)
# Prints:
# With appended transforms: Compose(
#     ToTensor()
#     RandomCrop(size=(28, 28), padding=4)
# )

# Check that the original dataset was not affected:
print('Original dataset:', avl_mnist.transform)
# Prints: "Original dataset: ToTensor()"
new_transform = transforms.RandomCrop(size=(28, 28), padding=4)

# Append a transformation. Simple as:
avl_mnist_replaced_transform = avl_mnist.replace_transforms(new_transform, None)

print('With replaced transform:', avl_mnist_replaced_transform.transform)
# Prints: "With replaces transforms: RandomCrop(size=(28, 28), padding=4)"

# Check that the original dataset was not affected:
print('Original dataset:', avl_mnist.transform)
# Prints: "Original dataset: ToTensor()"
from avalanche.benchmarks.classic.cmnist import PixelsPermutation
import numpy as np
import torch

# Instantiate MNIST train and test sets
mnist_train = MNIST('mnist_data', train=True, download=True)
mnist_test = MNIST('mnist_data', train=False, download=True)

# Define the transformation used to permute the pixels
rng_seed = 4321
rng_permute = np.random.RandomState(rng_seed)
idx_permute = torch.from_numpy(rng_permute.permutation(784)).type(torch.int64)
permutation_transform = PixelsPermutation(idx_permute)

# Define the transforms group
perm_group_transforms = dict(
    train=(permutation_transform, None),
    eval=(permutation_transform, None)
)

# Create the datasets and freeze transforms
# Note: one can call "freeze_transforms" on constructor result
# or you can do this in 2 steps. The result is the same (obviously).
# The next part show both ways:

# Train set
permuted_train_set = AvalancheDataset(
    mnist_train,
    transform_groups=perm_group_transforms).freeze_transforms()

# Test set
permuted_test_set = AvalancheDataset(
    mnist_test, transform_groups=perm_group_transforms,
    initial_transform_group='eval')
permuted_test_set = permuted_test_set.freeze_transforms()
# First, show that the image pixels are permuted
print('Before replace_transforms:')
display(permuted_train_set[0][0].resize((192, 192), 0))

# Try to remove the permutation
with_removed_transforms = permuted_train_set.replace_transforms(None, None)

print('After replace_transforms:')
display(permuted_train_set[0][0].resize((192, 192), 0))
display(with_removed_transforms[0][0].resize((192, 192), 0))
Benchmarks
Create your Continual Learning Benchmark and Start Prototyping
Welcome to the "benchmarks" tutorial of the "From Zero to Hero" series. In this part we will present the functionalities offered by the Benchmarks module.
🎯 Nomenclature
First off, let's clarify a bit the nomenclature we are going to use, introducing the following terms: Datasets, Scenarios, Benchmarks and Generators.
By Dataset we mean a collection of examples that can be used for training or testing purposes but not already organized to be processed as a stream of batches or tasks. Since Avalanche is based on Pytorch, our Datasets are objects.
By Scenario we mean a particular setting, i.e. specificities about the continual stream of data, a continual learning algorithm will face.
📚 The Benchmarks Module
The bechmarks module offers 3 types of utils:
Datasets: all the Pytorch datasets plus additional ones prepared by our community and particularly interesting for continual learning.
Classic Benchmarks: classic benchmarks used in CL litterature ready to be used with great flexibility.
Benchmarks Generators: a set of functions you can use to create your own benchmark starting from any kind of data and scenario. In particular, we distinguish two type of generators: Specific
But let's see how we can use this module in practice!
🖼️ Datasets
Let's start with the Datasets. As we previously hinted, in Avalanche you'll find all the standard Pytorch Datasets available in the torchvision package as well as a few others that are useful for continual learning but not already officially available within the Pytorch ecosystem.
Of course also the basic utilities ImageFolder and DatasetFolder can be used. These are two classes that you can use to create a Pytorch Dataset directly from your files (following a particular structure). You can read more about these in the Pytorch official documentation .
We also provide an additional FilelistDataset and AvalancheDataset classes. The former to construct a dataset from a filelist pointing to files anywhere on the disk. The latter to augment the basic Pytorch Dataset functionalities with an extention to better deal with a stack of transformations to be used during train and test.
🛠️ Benchmarks Basics
The Avalanche benchmarks (instances of the Scenario class), contains several attributes that characterize the benchmark. However, the most important ones are the train and test streams.
In Avalanche we often suppose to have access to these two parallel stream of data (even though some benchmarks may not provide such feature, but contain just a unique test set).
Each of these streams are iterable, indexable and sliceable objects that are composed of unique experiences. Experiences are batch of data (or "tasks") that can be provided with or without a specific task label.
Efficiency
It is worth mentioning that all the data belonging to a stream are not loaded into the RAM beforehand. Avalanche actually loads the data when a specific mini-batches are requested at training/test time based on the policy defined by each Dataset implementation.
This means that memory requirements are very low, while the speed is guaranteed by a multi-processing data loading system based on the one defined in Pytorch.
Scenarios
So, as we have seen, each scenario object in Avalanche has several useful attributes that characterizes the benchmark, including the two important train and test streams. Let's check what you can get from a scenario object more in details:
Train and Test Streams
The train and test streams can be used for training and testing purposes, respectively. This is what you can do with these streams:
Experiences
Each stream can in turn be treated as an iterator that produces a unique experience, containing all the useful data regarding a batch or task in the continual stream our algorithms will face. Check out how can you use these experiences below:
🏛️ Classic Benchmarks
Now that we know how our benchmarks work in general through scenarios, streams and experiences objects, in this section we are going to explore common benchmarks already available for you with one line of code yet flexible enough to allow proper tuning based on your needs:
Many of the classic benchmarks will download the original datasets they are based on automatically and put it under the "~/.avalanche/data" directory.
How to Use the Benchmarks
Let's see now how we can use the classic benchmark or the ones that you can create through the generators (see next section). For example, let's try out the classic PermutedMNIST benchmark (Task-Incremental scenario).
🐣 Benchmarks Generators
What if we want to create a new benchmark that is not present in the "Classic" ones? Well, in that case Avalanche offer a number of utilites that you can use to create your own benchmark with maximum flexibility: the benchmarks generators!
Specific Generators
The specific scenario generators are useful when starting from one or multiple Pytorch datasets you want to create a "New Instances" or "New Classes" benchmark: i.e. it supports the easy and flexible creation of a Domain-Incremental, Class-Incremental or Task-Incremental scenarios among others.
For the New Classes scenario you can use the following function:
nc_benchmark
for the New Instances:
ni_benchmark
Let's start by creating the MNIST dataset object as we would normally do in Pytorch:
Then we can, for example, create a new benchmark based on MNIST and the classic Domain-Incremental scenario:
Or, we can create a benchmark based on MNIST and the Class-Incremental (what's commonly referred to as "Split-MNIST" benchmark):
Generic Generators
Finally, if you cannot create your ideal benchmark since it does not fit well in the aforementioned new classes or new instances scenarios, you can always use our generic generators:
filelist_benchmark
paths_benchmark
dataset_benchmark
Let's start with the filelist_benchmark utility. This function is particularly useful when it is important to preserve a particular order of the patterns to be processed (for example if they are frames of a video), or in general if we have data scattered around our drive and we want to create a sequence of batches/tasks providing only a txt file containing the list of their paths.
For Avalanche we follow the same format of the Caffe filelists ("pathclass_label"):
/path/to/a/file.jpg 0
/path/to/another/file.jpg 0
...
/path/to/another/file.jpg M
/path/to/another/file.jpg M
...
/path/to/another/file.jpg N
/path/to/another/file.jpg N
So let's download the classic "Cats vs Dogs" dataset as an example:
You can now see in the content directory on colab the image we downloaded. We are now going to create the filelists and then use the filelist_benchmark function to create our benchmark:
In the previous cell we created a benchmark instance starting from file lists. However, paths_benchmark is a better choice if you already have the list of paths directly loaded in memory:
Let us see how we can use the dataset_benchmark utility, where we can use several PyTorch datasets as different batches or tasks. This utility expectes a list of datasets for the train, test (and other custom) streams. Each dataset will be used to create an experience:
Adding task labels can be achieved by wrapping each datasets using AvalancheDataset. Apart from task labels, AvalancheDataset allows for more control over transformations and offers an ever growing set of utilities (check the documentation for more details).
And finally, the tensors_benchmark generator:
This completes the "Benchmark" tutorial for the "From Zero to Hero" series. We hope you enjoyed it!
🤝 Run it on Google Colab
You can run this chapter and play with it on Google Colaboratory:
!pip install avalanche-lib==0.2.1
By Benchmark we mean a well-defined and carefully thought combination of a scenario with one or multiple datasets that we can use to asses our continual learning algorithms.
By Generator we mean a function that given a specific scenario and a dataset can generate a Benchmark.
and
Generic
. The first ones will let you create a benchmark based on a clear scenarios and Pytorch dataset(s); the latters, instead, are more generic and flexible, both in terms of scenario definition then in terms of type of data they can manage.
Specific:
nc_benchmark: given one or multiple datasets it creates a benchmark instance based on scenarios where New Classes (NC) are encountered over time. Notable scenarios that can be created using this utility include Class-Incremental, Task-Incremental and Task-Agnostic scenarios.
ni_benchmark: it creates a benchmark instance based on scenarios where New Instances (NI), i.e. new examples of the same classes are encountered over time. Notable scenarios that can be created using this utility include Domain-Incremental scenarios.
Generic:
filelist_benchmark: It creates a benchmark instance given a list of filelists.
paths_benchmark: It creates a benchmark instance given a list of file paths and class labels.
import torch
import torchvision
from avalanche.benchmarks.datasets import MNIST, FashionMNIST, KMNIST, EMNIST, \
QMNIST, FakeData, CocoCaptions, CocoDetection, LSUN, ImageNet, CIFAR10, \
CIFAR100, STL10, SVHN, PhotoTour, SBU, Flickr8k, Flickr30k, VOCDetection, \
VOCSegmentation, Cityscapes, SBDataset, USPS, Kinetics400, HMDB51, UCF101, \
CelebA, CORe50Dataset, TinyImagenet, CUB200, OpenLORIS

# As we would simply do with any Pytorch dataset we can create the train and
# test sets from it. We could use any of the above imported Datasets, but let's
# just try to use the standard MNIST.
train_MNIST = MNIST(
    './data/mnist', train=True, download=True, transform=torchvision.transforms.ToTensor()
)
test_MNIST = MNIST(
    './data/mnist', train=False, download=True, transform=torchvision.transforms.ToTensor()
)

# Given these two sets we can simply iterate them to get the examples one by one
for i, example in enumerate(train_MNIST):
    pass
print("Num. examples processed: {}".format(i))

# or use a Pytorch DataLoader
train_loader = torch.utils.data.DataLoader(
    train_MNIST, batch_size=32, shuffle=True
)
for i, (x, y) in enumerate(train_loader):
    pass
print("Num. mini-batch processed: {}".format(i))
from avalanche.benchmarks.utils import ImageFolder, DatasetFolder, FilelistDataset, AvalancheDataset
from avalanche.benchmarks.classic import SplitMNIST
split_mnist = SplitMNIST(n_experiences=5, seed=1)

# Original train/test sets
print('--- Original datasets:')
print(split_mnist.original_train_dataset)
print(split_mnist.original_test_dataset)

# A list describing which training patterns are assigned to each experience.
# Patterns are identified by their id w.r.t. the dataset found in the
# original_train_dataset field.
print('--- Train patterns assignment:')
print(split_mnist.train_exps_patterns_assignment)

# A list describing which test patterns are assigned to each experience.
# Patterns are identified by their id w.r.t. the dataset found in the
# original_test_dataset field
print('--- Test patterns assignment:')
print(split_mnist.test_exps_patterns_assignment)

# the task label of each experience.
print('--- Task labels:')
print(split_mnist.task_labels)

# train and test streams
print('--- Streams:')
print(split_mnist.train_stream)
print(split_mnist.test_stream)

# A list that, for each experience (identified by its index/ID),
# stores a set of the (optionally remapped) IDs of classes of patterns
# assigned to that experience.
print('--- Classes in each experience:')
print(split_mnist.original_classes_in_exp)
# each stream has a name: "train" or "test"
train_stream = split_mnist.train_stream
print(train_stream.name)

# we have access to the scenario from which the stream was taken
train_stream.benchmark

# we can slice and reorder the stream as we like!
substream = train_stream[0]
substream = train_stream[0:2]
substream = train_stream[0,2,1]

len(substream)
# we get the first experience
experience = train_stream[0]

# task label and dataset are the main attributes
t_label = experience.task_label
dataset = experience.dataset

# but you can recover additional info
experience.current_experience
experience.classes_in_this_experience
experience.classes_seen_so_far
experience.previous_classes
experience.future_classes
experience.origin_stream
experience.benchmark

# As always, we can iterate over it normally or with a pytorch
# data loader.
# For instance, we can use tqdm to add a progress bar.
from tqdm import tqdm
for i, data in enumerate(tqdm(dataset)):
  pass
print("\nNumber of examples:", i + 1)
print("Task Label:", t_label)
# creating the benchmark instance (scenario object)
perm_mnist = PermutedMNIST(
  n_experiences=3,
  seed=1234,
)

# recovering the train and test streams
train_stream = perm_mnist.train_stream
test_stream = perm_mnist.test_stream

# iterating over the train stream
for experience in train_stream:
  print("Start of task ", experience.task_label)
  print('Classes in this task:', experience.classes_in_this_experience)

  # The current Pytorch training set can be easily recovered through the
  # experience
  current_training_set = experience.dataset
  # ...as well as the task_label
  print('Task {}'.format(experience.task_label))
  print('This task contains', len(current_training_set), 'training examples')

  # we can recover the corresponding test experience in the test stream
  current_test_set = test_stream[experience.current_experience].dataset
  print('This task contains', len(current_test_set), 'test examples')
from avalanche.benchmarks.generators import nc_benchmark, ni_benchmark
import os
# let's create the filelists since we don't have it
dirpath = "cats_and_dogs_filtered/train"

for filelist, rel_dir, t_label in zip(
        ["train_filelist_00.txt", "train_filelist_01.txt"],
        ["cats", "dogs"],
        [0, 1]):
    # First, obtain the list of files
    filenames_list = os.listdir(os.path.join(dirpath, rel_dir))

    # Create the text file containing the filelist
    # Filelists must be in Caffe-style, which means
    # that they must define path in the format:
    #
    # relative_path_img1 class_label_first_img
    # relative_path_img2 class_label_second_img
    # ...
    #
    # For instance:
    # cat/cat_0.png 1
    # dog/dog_54.png 0
    # cat/cat_3.png 1
    # ...
    #
    # Paths are relative to a root path
    # (specified when calling filelist_benchmark)
    with open(filelist, "w") as wf:
        for name in filenames_list:
            wf.write(
                "{} {}\n".format(os.path.join(rel_dir, name), t_label)
            )

# Here we create a GenericCLScenario ready to be iterated
generic_scenario = filelist_benchmark(
   dirpath,
   ["train_filelist_00.txt", "train_filelist_01.txt"],
   ["train_filelist_00.txt"],
   task_labels=[0, 0],
   complete_test_set_only=True,
   train_transform=ToTensor(),
   eval_transform=ToTensor()
)
train_experiences = []
for rel_dir, label in zip(
        ["cats", "dogs"],
        [0, 1]):
    # First, obtain the list of files
    filenames_list = os.listdir(os.path.join(dirpath, rel_dir))

    # Don't create a file list: instead, we create a list of
    # paths + class labels
    experience_paths = []
    for name in filenames_list:
      instance_tuple = (os.path.join(dirpath, rel_dir, name), label)
      experience_paths.append(instance_tuple)
    train_experiences.append(experience_paths)

# Here we create a GenericCLScenario ready to be iterated
generic_scenario = paths_benchmark(
   train_experiences,
   [train_experiences[0]],  # Single test set
   task_labels=[0, 0],
   complete_test_set_only=True,
   train_transform=ToTensor(),
   eval_transform=ToTensor()
)
# Alternatively, task labels can also be a list (or tensor)
# containing the task label of each pattern

train_MNIST_task0 = AvalancheDataset(train_cifar10, task_labels=0)
test_MNIST_task0 = AvalancheDataset(test_cifar10, task_labels=0)

train_cifar10_task1 = AvalancheDataset(train_cifar10, task_labels=1)
test_cifar10_task1 = AvalancheDataset(test_cifar10, task_labels=1)

scenario_custom_task_labels = dataset_benchmark(
    [train_MNIST_task0, train_cifar10_task1],
    [test_MNIST_task0, test_cifar10_task1]
)

print('Without custom task labels:',
      generic_scenario.train_stream[1].task_label)

print('With custom task labels:',
      scenario_custom_task_labels.train_stream[1].task_label)
pattern_shape = (3, 32, 32)

# Definition of training experiences
# Experience 1
experience_1_x = torch.zeros(100, *pattern_shape)
experience_1_y = torch.zeros(100, dtype=torch.long)

# Experience 2
experience_2_x = torch.zeros(80, *pattern_shape)
experience_2_y = torch.ones(80, dtype=torch.long)

# Test experience
# For this example we define a single test experience,
# but "tensors_benchmark" allows you to define even more than one!
test_x = torch.zeros(50, *pattern_shape)
test_y = torch.zeros(50, dtype=torch.long)

generic_scenario = tensors_benchmark(
    train_tensors=[(experience_1_x, experience_1_y), (experience_2_x, experience_2_y)],
    test_tensors=[(test_x, test_y)],
    task_labels=[0, 0],  # Task label of each train exp
    complete_test_set_only=True
)
tensors_benchmark: It creates a benchmark instance given a list of tensors.
dataset_benchmark: It creates a benchmark instance given a list of pytorch datasets.